12. GitHub, Version Control and Collaboration#
Contents
Co-authored with Arnav Sood
An essential part of modern software engineering is using version control.
We use version control because
Not all iterations on a file are perfect, and you may want to revert changes.
We want to be able to see who has changed what and how.
We want a uniform version scheme to do this between people and machines.
Concurrent editing on code is necessary for collaboration.
Version control is an essential part of creating reproducible research.
In this lecture, we’ll discuss how to use Git and GitHub, largely with the built in VS Code support.
We assume that you have followed the VS Code instructions.
12.1. Setup#
Make sure you create an account on GitHub.com.
If you are a student, consider signing up for the GitHub Student Developer Pack which gives you free GitHub Pro
Otherwise, see if you qualify for a free Research or Educator Plan which gives you free GitHub Team
Ensure that git is installed (as it likely was in the getting started)
Setup your git username, and change default line-endings if on Windows
Opening a terminal (on Windows you can use a powershell or the new “Git Bash” installed in the previous step)
Running the following, where the first two lines are not required on linux and OS/X, and you should replace the email and name in the final lines
git config --global core.eol lf
git config --global core.autocrlf false
git config --global user.email "you@example.com"
git config --global user.name "Your Name"
git config --global github.user "GITHUBUSERNAME"
Ensure that VS Code is installed
Install the GitLens extension.
Optional, but highly recommended.
It provides an enormous amount of detail on exact code changes within github repositories (e.g., seamless information on the time and individual who last modified each line of code).
12.1.1. Git vs. GitHub vs. Git Clients#
To understand the relationship
Git is an infrastructure for versioning and merging files (it is not specific to GitHub and does not even require an online server).
GitHub provides an online service to coordinate working with Git repositories, and adds some additional features for managing projects.
GitHub is the market leader for open source projects and Julia, but there are other options, e.g. GitLab and Bitbucket.
We will use the built-in VS Code Git and GitHub support in this lecture, but you may consider using alternatives
GitHub Desktop is a clean and simple GUI for git, which is often useful in conjunction with VS Code.
GitKraken is a superb, specialized tool which makes many advanced operations intuitive.
Or, you may directly use the Git command line, which can be convenient for simple operations (e.g.
git clone https://github.com/QuantEcon/lecture-julia.notebookswould clone the notebook repository), but tends to be harder for more advanced operations.
Since these lecture notes are intended to provide a minimal path to using the technologies, here we will conflate the workflow of these distinct products.
12.2. Basic Objects#
12.2.1. Repositories#
The fundamental object in GitHub is a repository (or “repo”) – this is the master directory for a project.
One example of a repo is the Distributions Distributions.jl package.
On the machine, a repo is a normal directory, along with a subdirectory called .git which contains the history of changes.
12.2.2. Commits#
GitHub stores history as a sequence of changes to text, called commits.
Here is an example of a commit, which modifies instructions on using an extension in these lecture notes.
In particular, commits have the following features
An ID (formally, an “SHA-1 hash”)
Content (i.e., a before and after state)
Metadata (author, timestamp, commit message, etc.)
Note: It’s crucial to remember that what’s stored in a commit is only the actual changes you make to text.
This is a key reason why git can store long and complicated histories without consuming massive amounts of memory.
12.2.3. Common Files#
In addition, each GitHub repository usually comes with a few standard text files
A
.gitignorefile, which lists files/extensions/directories that GitHub shouldn’t try to track (e.g., LaTeX compilation byproducts).A
README.mdfile, which is a Markdown file which GitHub displays by default as the homepage when accessing the repository online.A
LICENSE.mdfile, which describes the terms under which the repository’s contents are made available.
For an example of all three, see the Distributions.jl repo.
12.3. Individual Workflow#
In this section, we’ll describe how to use GitHub to version your own projects.
Much of this will carry over to the collaborative section.
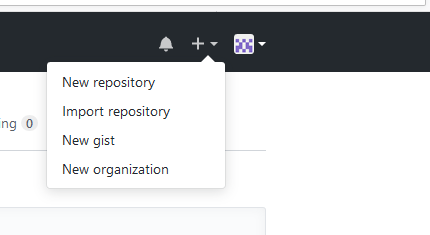
12.3.1. Creating a Repository#
In general, we will always want to make repos for new projects using the following dropdown
We can then configure repository options as such
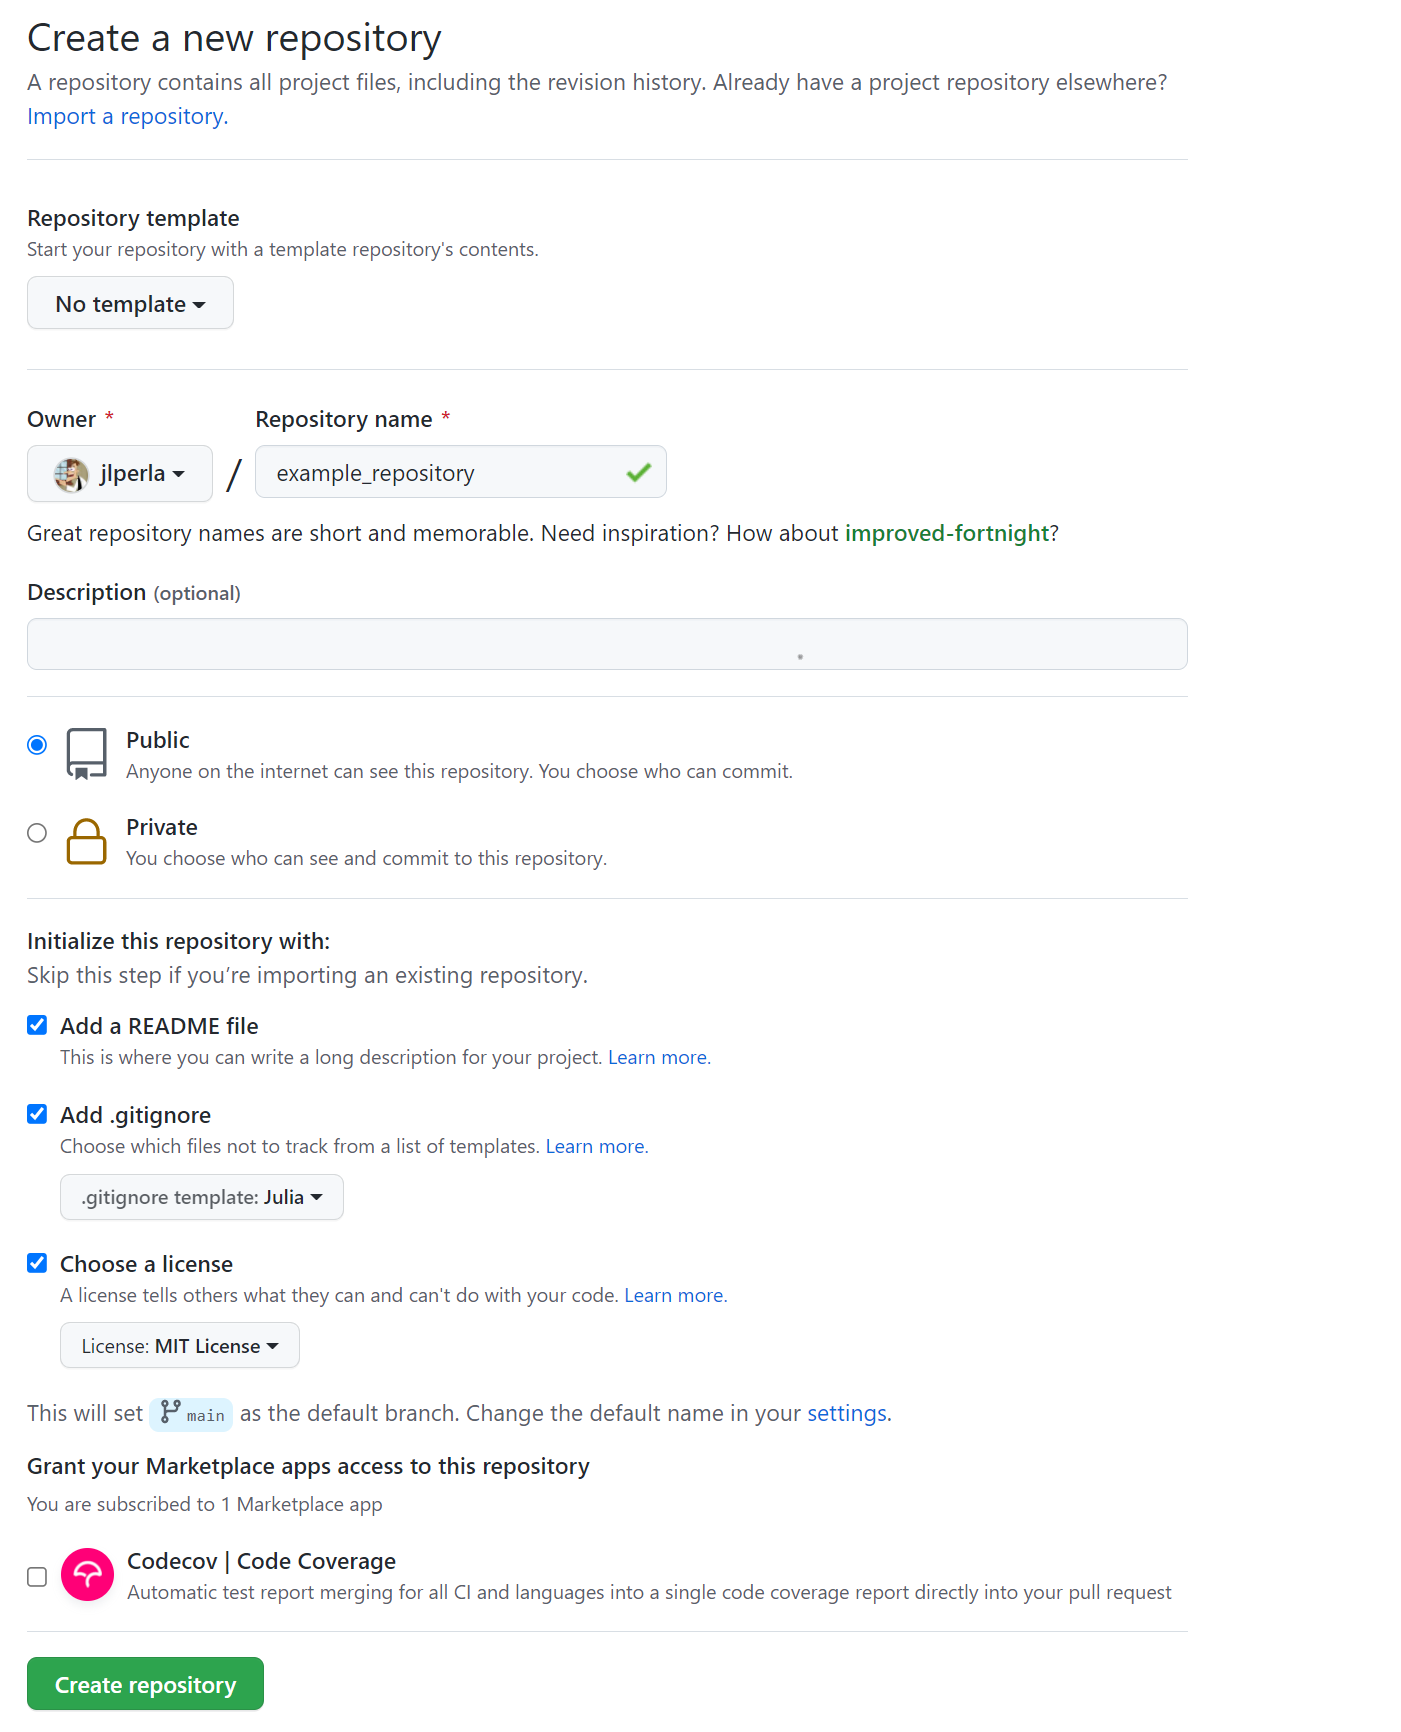
In this case, we’re making a public repo github.com/USERNAME/example_repository where USERNAME is your GitHub account name. The options chosen are:
Add in a
README.md.License under the MIT open-source License.
Ignore Julia compilation byproducts in the
.gitignore.Leave off support for the Marketplace Apps
Codecov, which we will discuss further in the testing lecture lecture.
Note
You can also add an existing folder as a new repository on github, where you can use the VS Code features to initialize and publish a repository to GitHub. Otherwise, the instructions are more involved.
12.3.2. Cloning a Repository#
The next step is to get this to our local machine. If you click on the <> Code button on the repositories website, you will see a dropdown such as
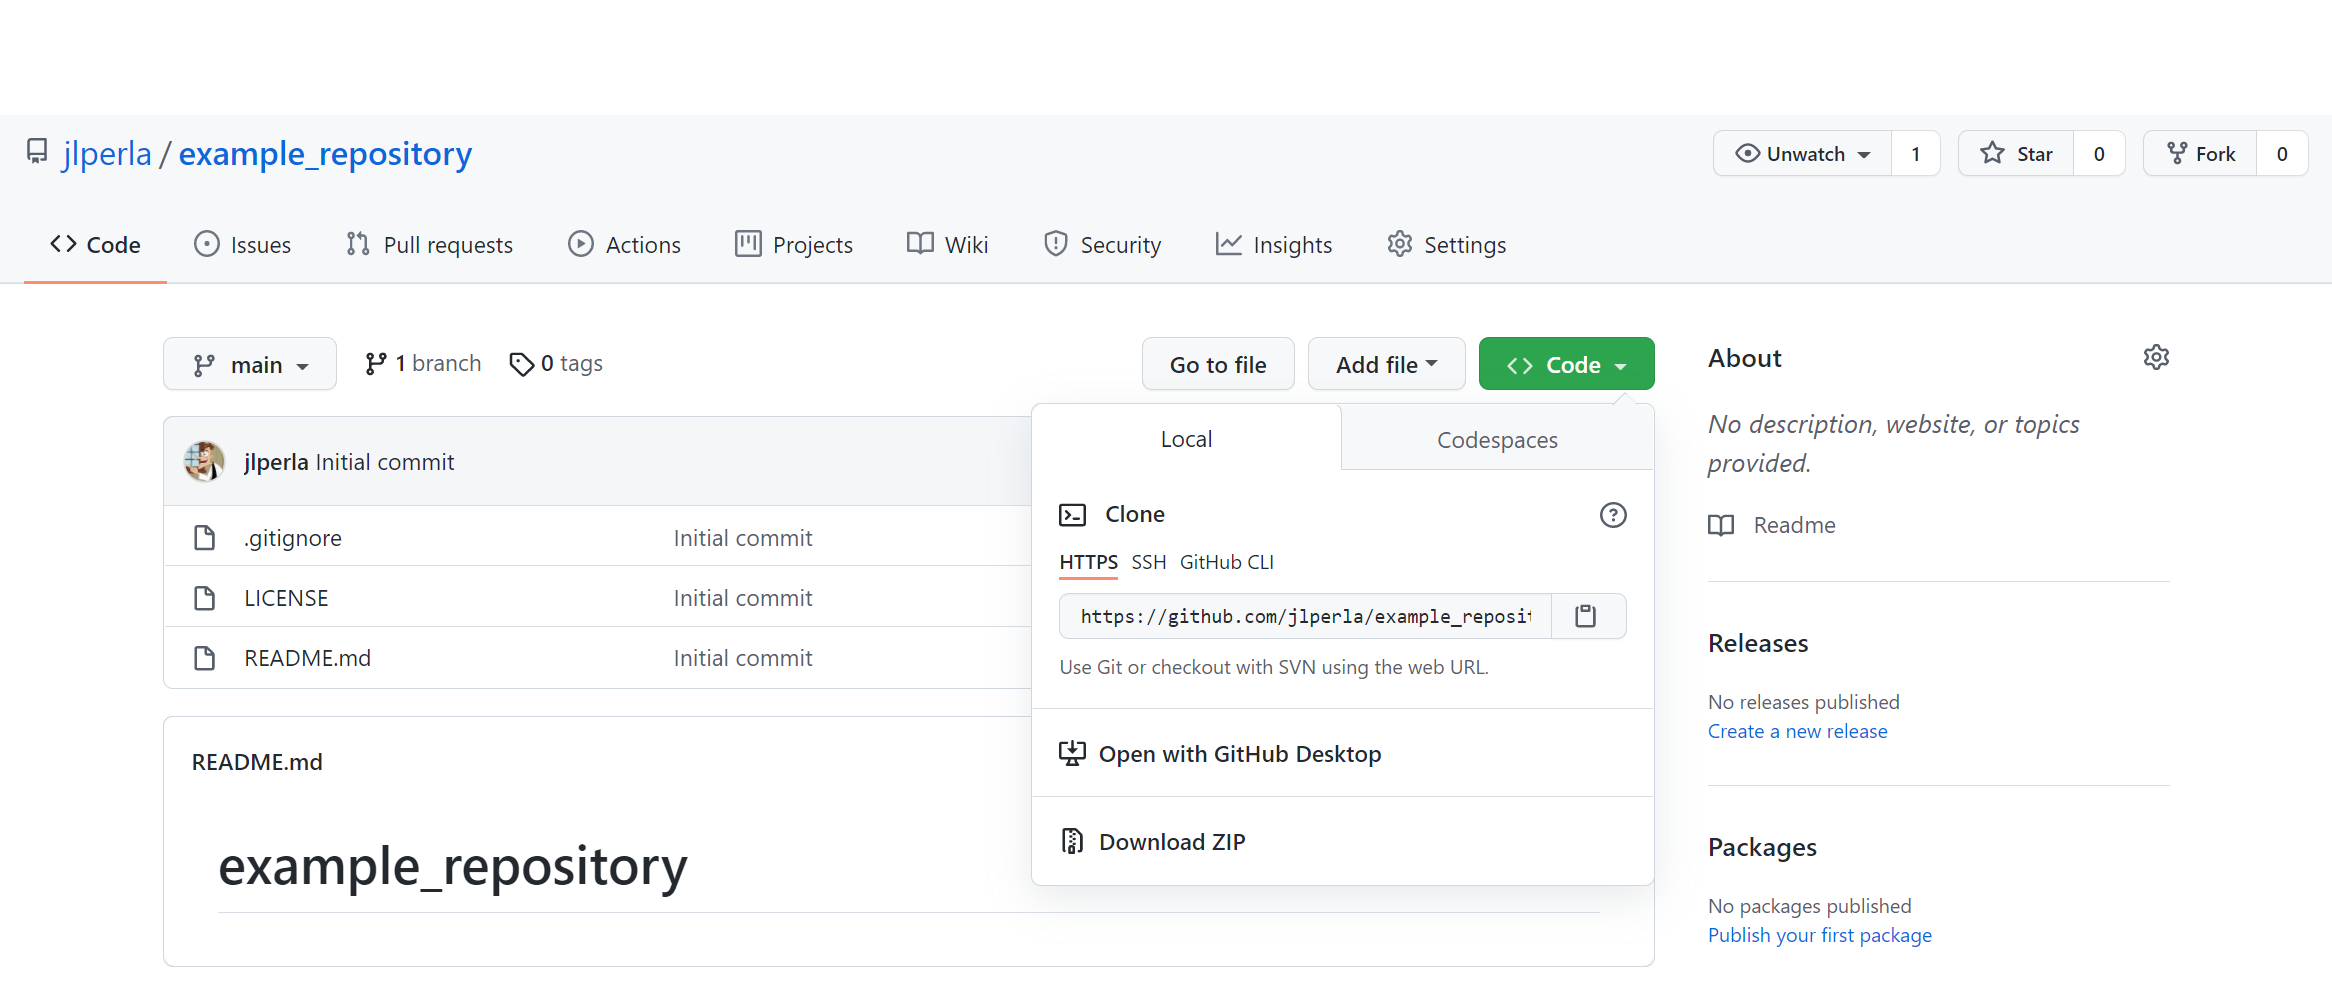
This dropdown gives us a few options
The copy button below the
ClonewithHTTPScan be used by either the commandline or other tools.Open in Desktopwill call to the GitHub Desktop application if you installed itDownload Zipwill download the directory without the .git subdirectory (avoid this option, as it defeats the purpose of version control).
We will download the repository using the built-in VS Code support.
Copy the https URL in that dropdown (e.g.
https://github.com/USERNAME/example_repository.git).Start VS Code.
Use
Ctrl+Shift+Pto open the command bar, and choose> Git: CloneAt this point, you can paste in the copied URL or choose
Clone from GitHuband then it will let you select your repositories after logging in.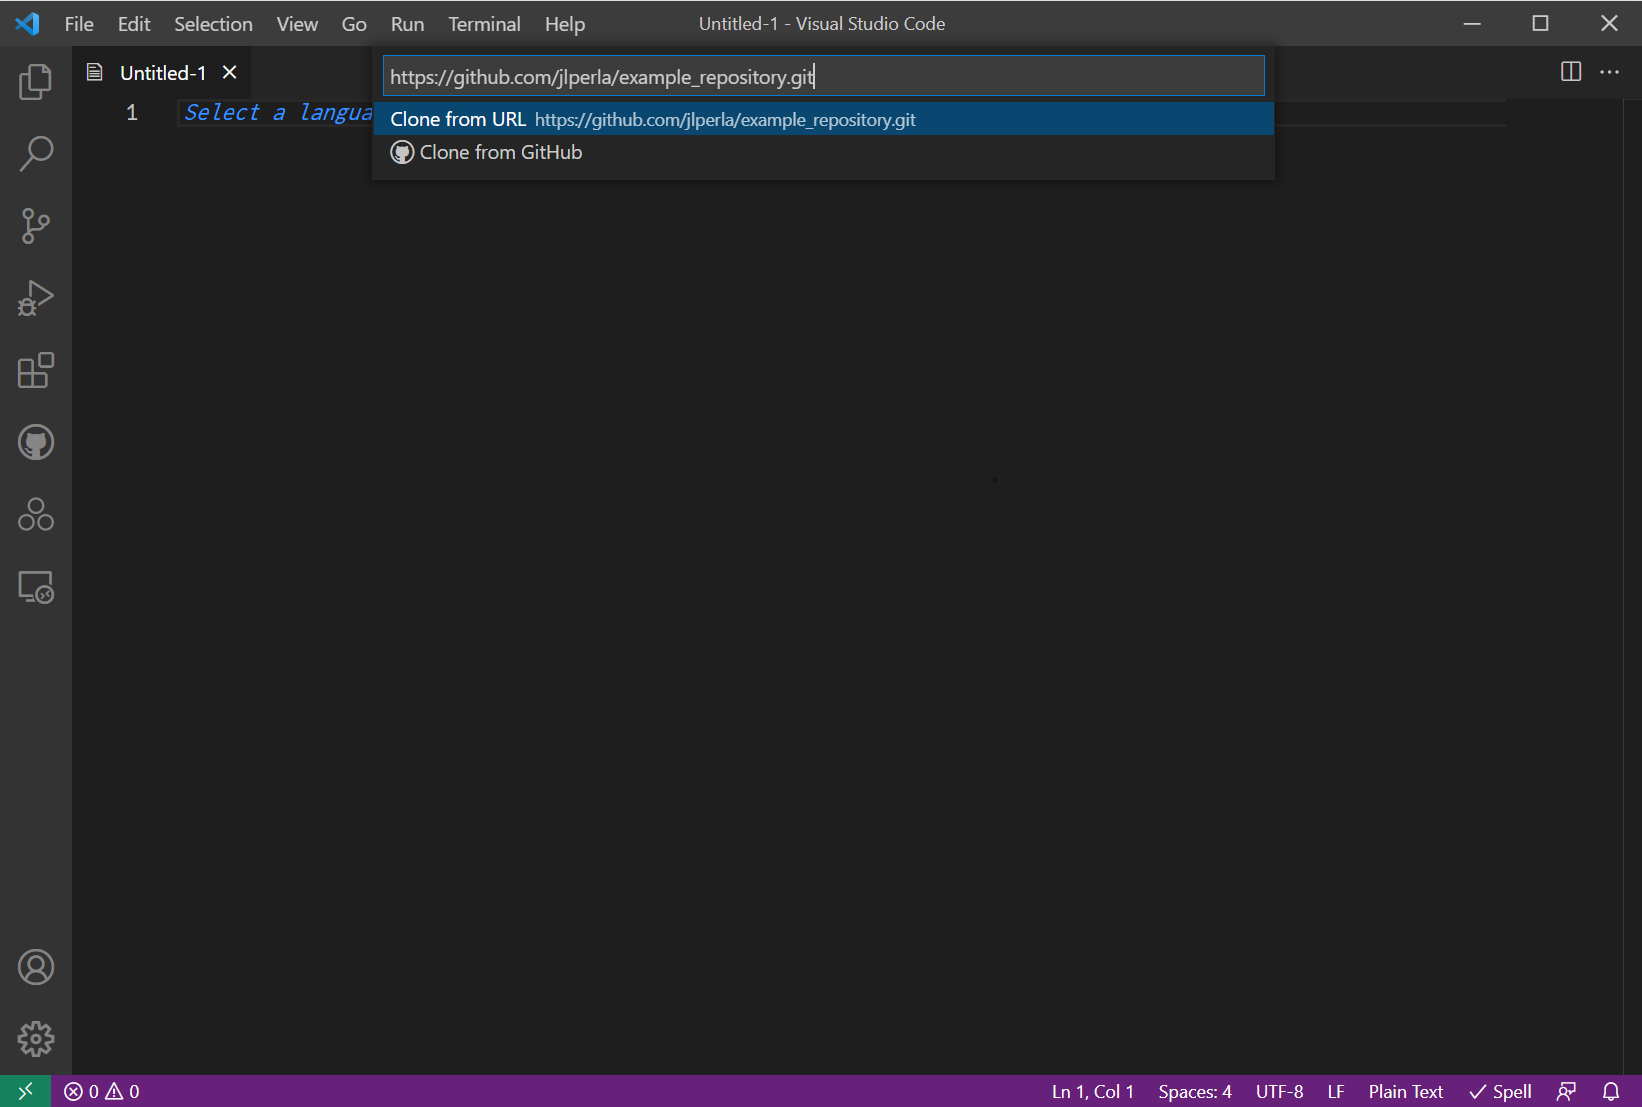
Select a location (e.g.
c:\users\USERNAME\GitHub) which will clone the repository into a folder (e.g. intoc:\users\USERNAME\GitHub\example_repository) which holds both the files themselves and the version information. This folder then has all of the information associated with this repository.After the repository is cloned, you can choose to
Open in a New Window.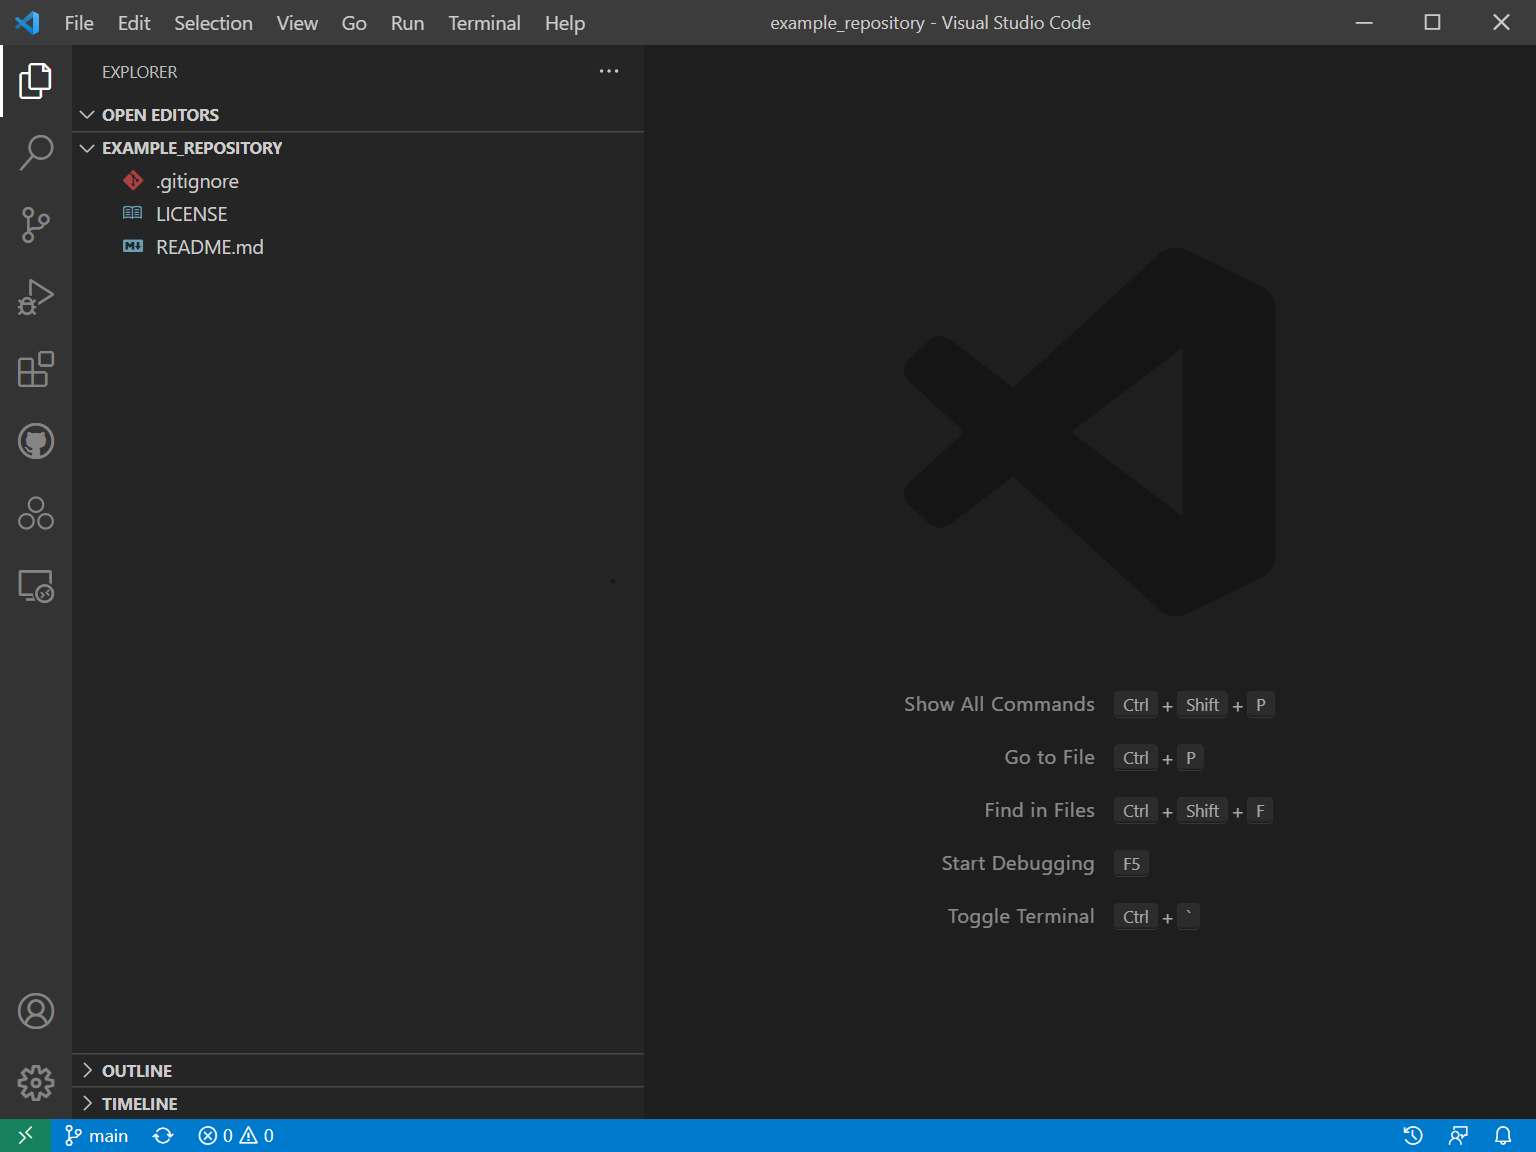
You will see the automatically generated files for the LICENSE, .gitignore and README.md.
Note
To manually clone this to your desktop, you can start a terminal and use git clone https://github.com/USERNAME/example_repository.git within the directory you want to clone it to. After cloning, you can open the folder within VS Code by either
Within a terminal on your operating system, navigate to that directory and type
code .On Windows if you installed VS Code with the appropriate option, right click on the folder and choose
Open with Code- trusting the authors as required on opening the folder.In the VS Code Menu, choose
File/Open Folder....
12.3.3. Making, Committing, and Pushing Changes#
Now that we have the repository, we can start working with it.
Within VS Code, make the following changes:
Open the
README.mdand add some text.Add a new file called
some_file.txtwith some text in it. You can do this with the menus, or by right clicking in the Files panel and selecting “New File”.Add another new file called
garbage_file.tmpwith some text in it.Finally, in the
.gitignore, add*.tmpat the end.
Your editor should look something like
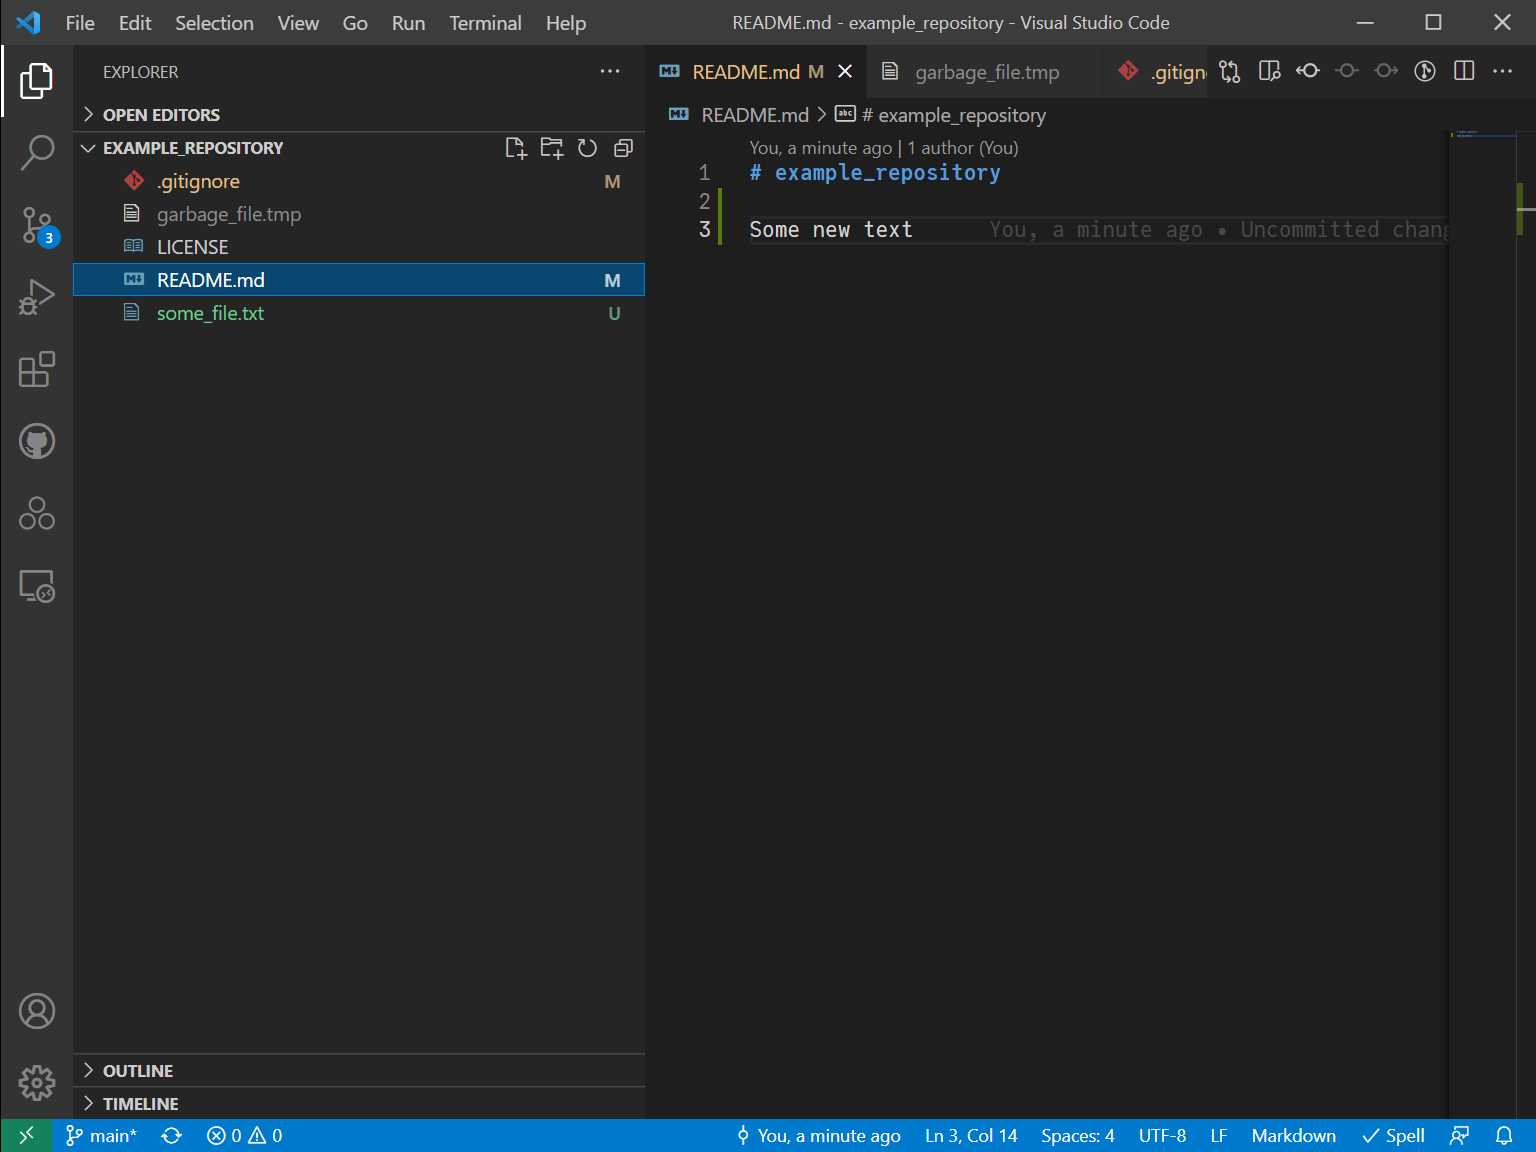
Note that the panel on the left hand side is highlighted with 3 changes. Select that tab to see the current modifications relative to the current version on github.
This shows three changes:
README.mdis modified..gitignoreis modified.some_file.txtis a new file.
Note that garbage_file.tmp is not listed, as the *.tmp extension was ignored in the .gitignore.
If you click on a file, such as the README.md in this panel, it will open up the file to show all of the changes relative to the last commit. For example,
Let us push these changes to GitHub. Add text in the “Message” in this panel, and then click on the checkmark to commit it.
As git is a decentralized version control system, this change is now only local to your machine. You can make a variety of changes locally and only push to GitHub when you are ready.
To push these to the server, you can use the > Git: Push command or you can click on the bottom bar of vscode, which should show that one commit is ready to be uploaded and none are ready to be downloaded.

12.3.4. Exploring Commits in VS Code and on the GitHub Website#
If you refresh your web browser with the github repository open, you will see changes and that it now shows multiple commits have been made to this project, as well as the last person to modify it.

This functionality will help you track down changes in a project, and in particular, provide tools to track down when functionality may have stopped working or parameters were changed in a project.
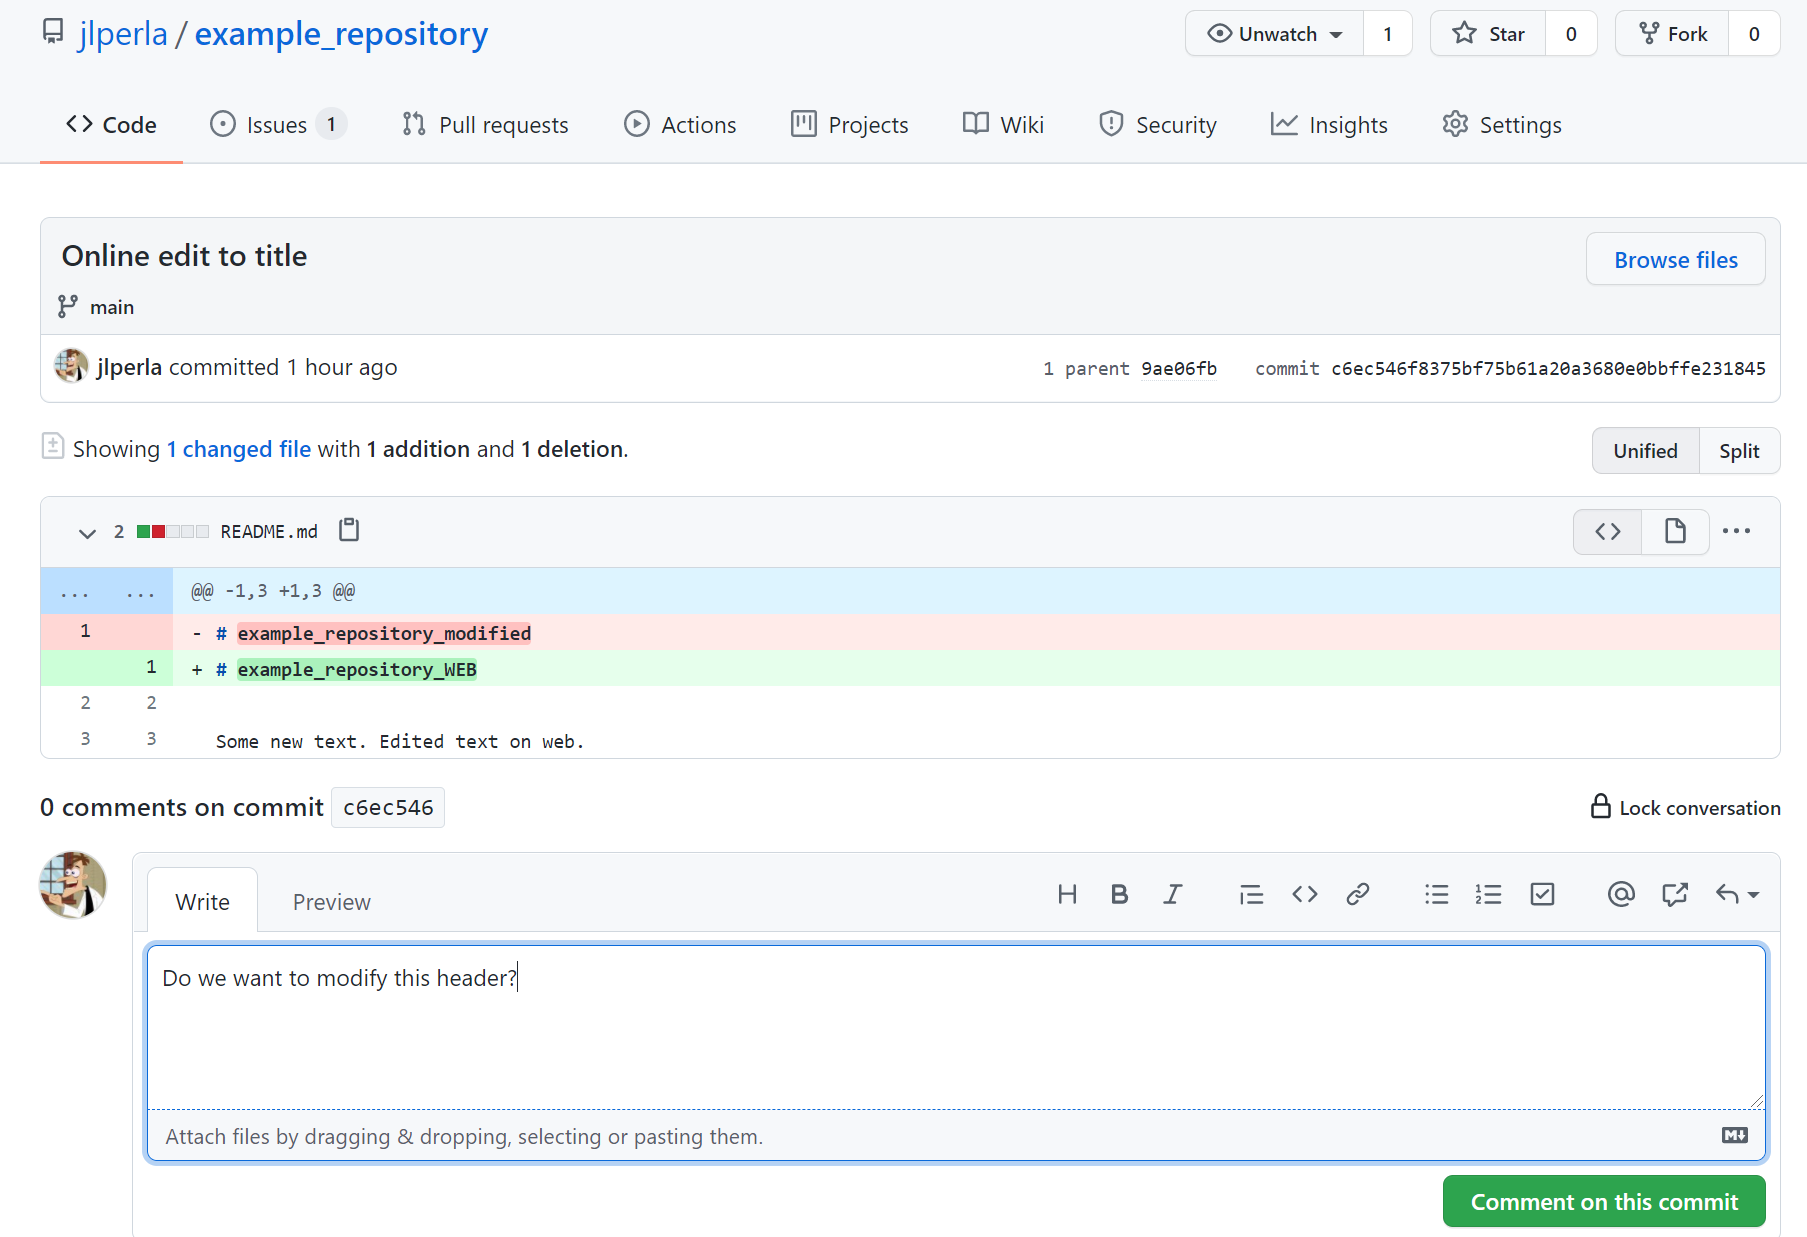
On that page, either choose the description of the commit to display it, or choose the entire list (e.g. 2 commits) and select the most recent.
This shows a summary of all of the changes between this commit and the last.
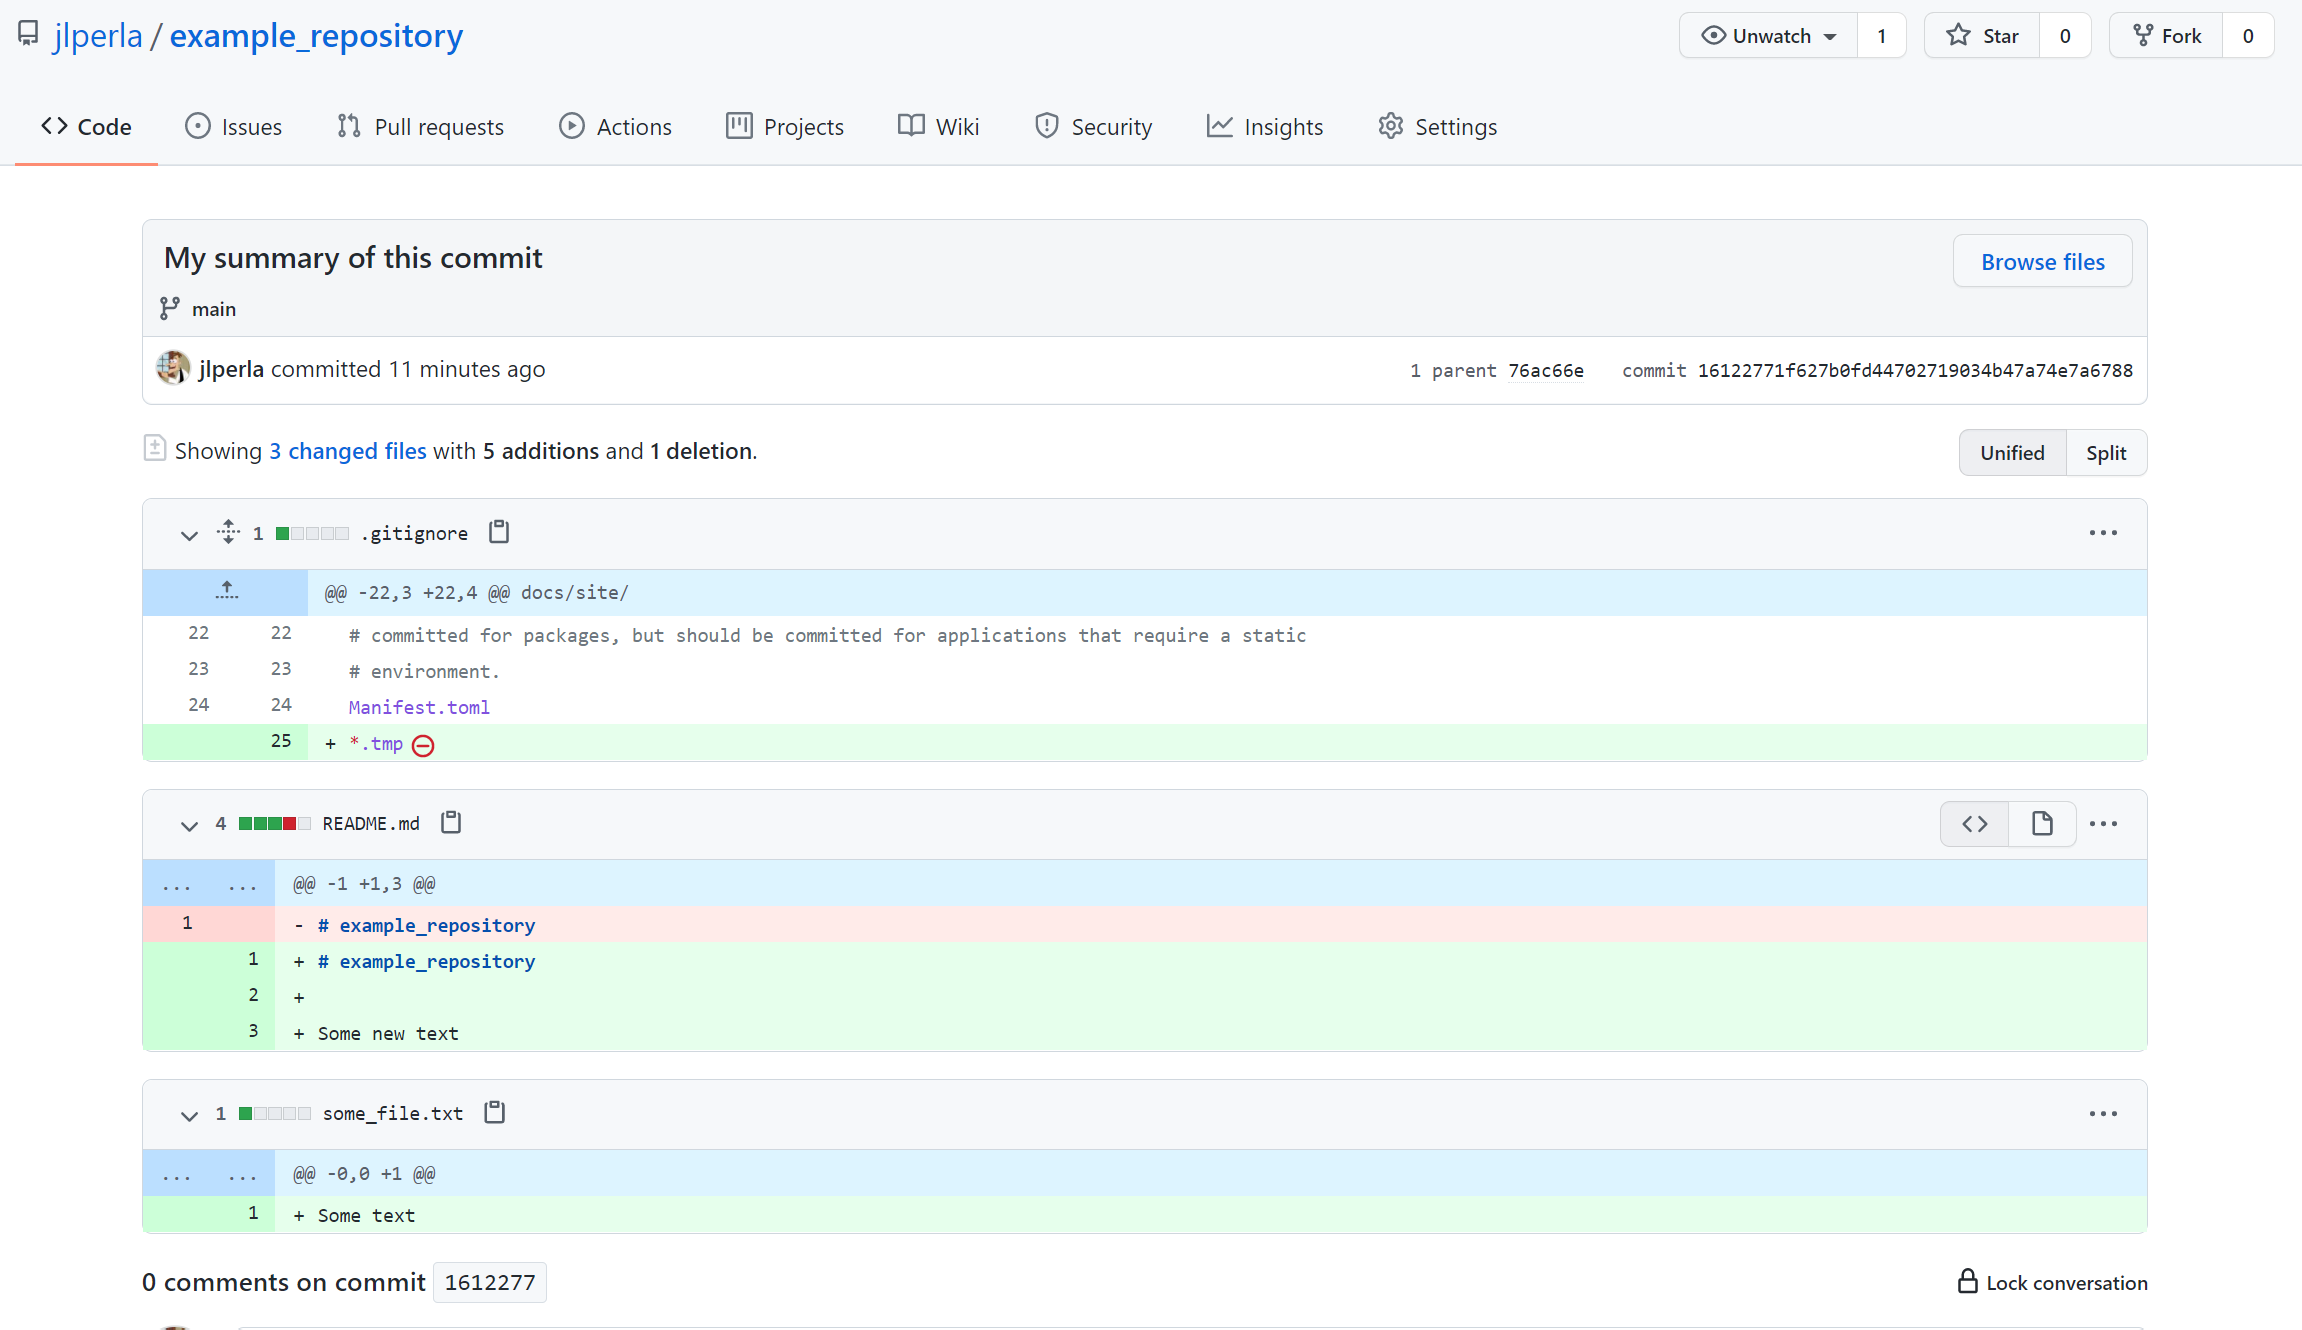
This interface lets you explore all of the lines of code that were modified between different commits to track down changes.
Finally, with the GitLens extension, you can see this information within the files themselves. Open the README.md file, and move your typing cursor to one of the lines within the file.
You will then see a nearly transparent description of (1) who made the last modification to this line; (2) when it occurred; and (3) the message on the commit that modified it. If you further hover over this you can access even more information on the appropriate commit
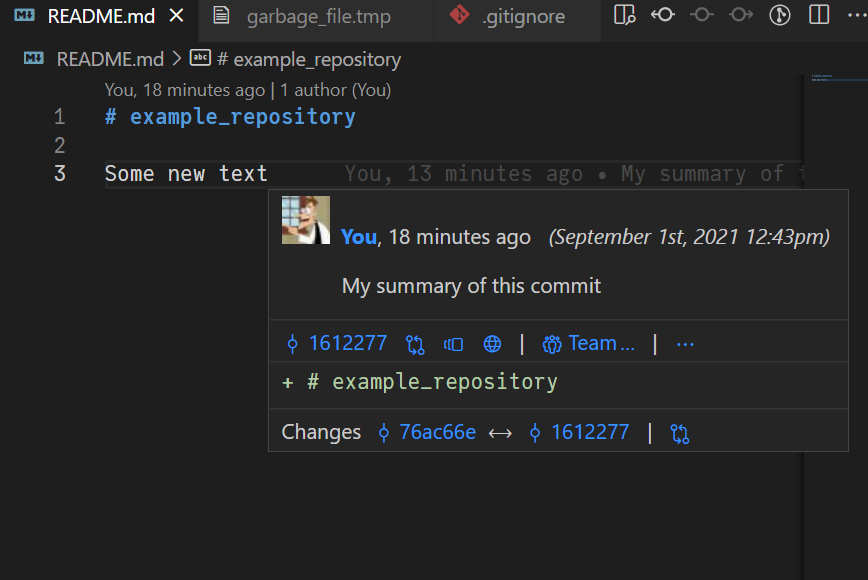
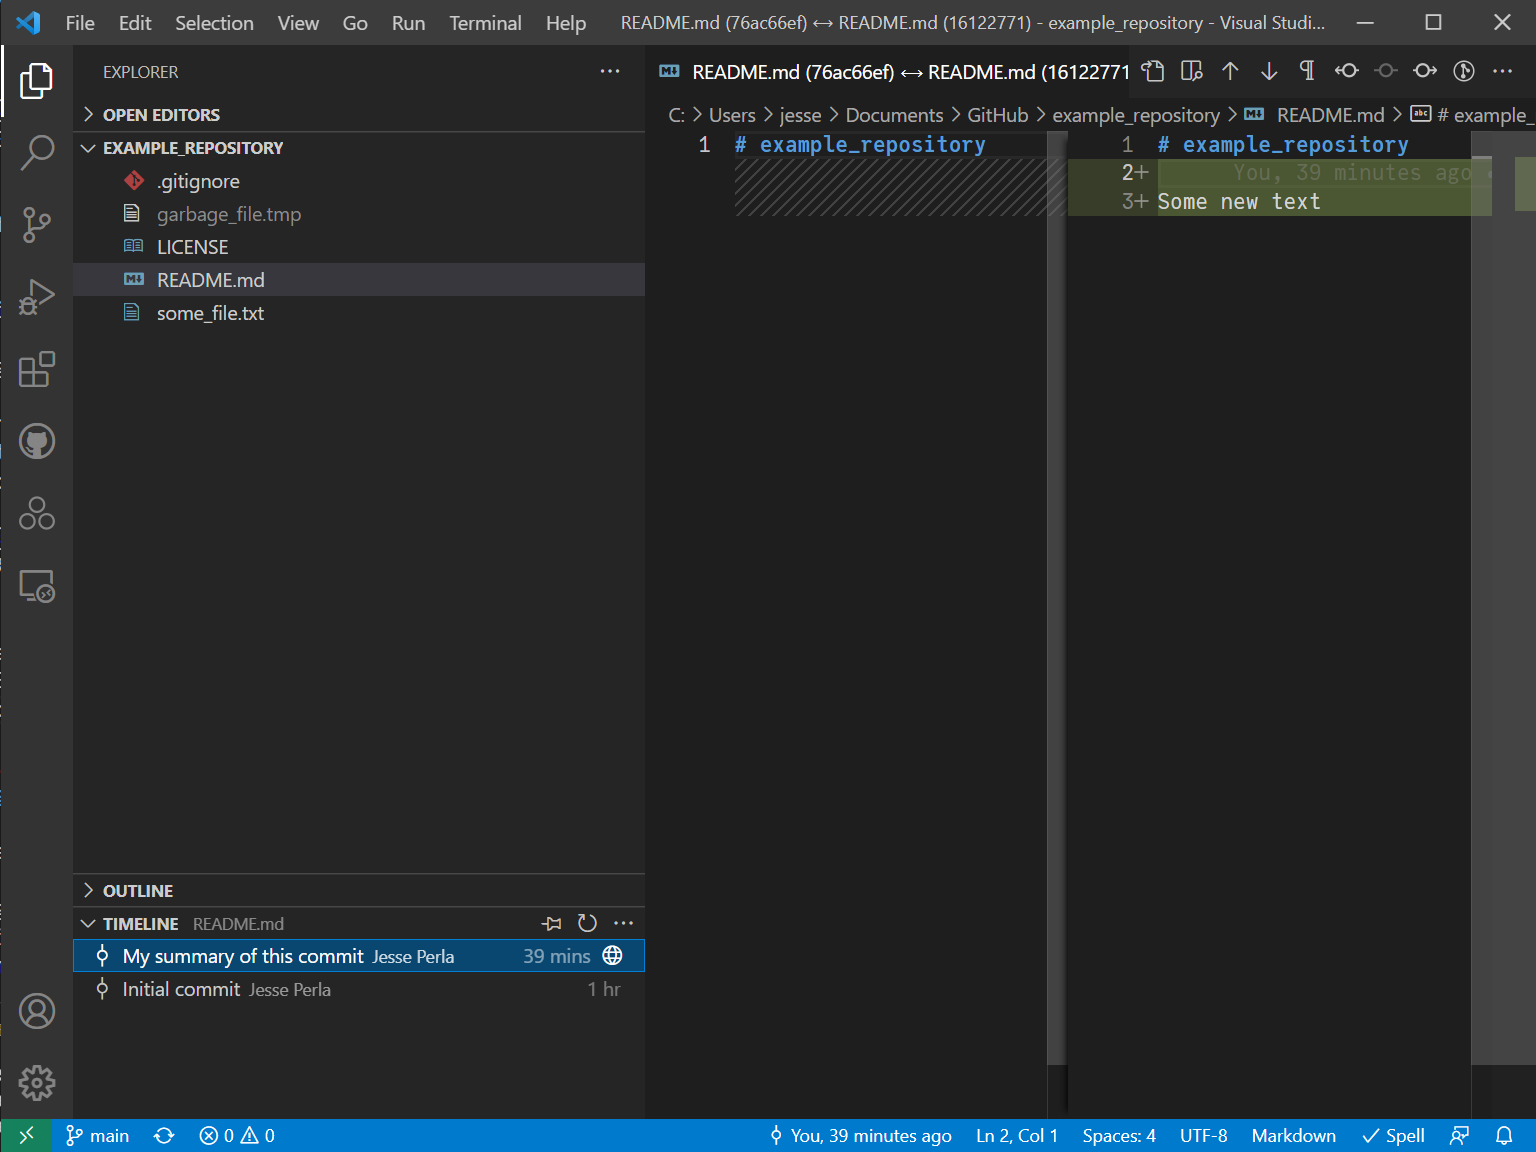
You can see more detail on that commit in a variety of ways - such as clicking on that popup. One convenient approach is in the main Explorer pane (not the Git pane), which as an expandable Timeline. Select this for the README.md to compare the current version to another in the timeline,
12.3.5. Pulling Changes and the Online Editor#
The opposite of pushing changes is to pull changes made externally and previously pushed to GitHub.
To see this workflow, we will make an external modification and bring the changes locally.
Start in the GitHub webpage for your repository and choose the README.md file.
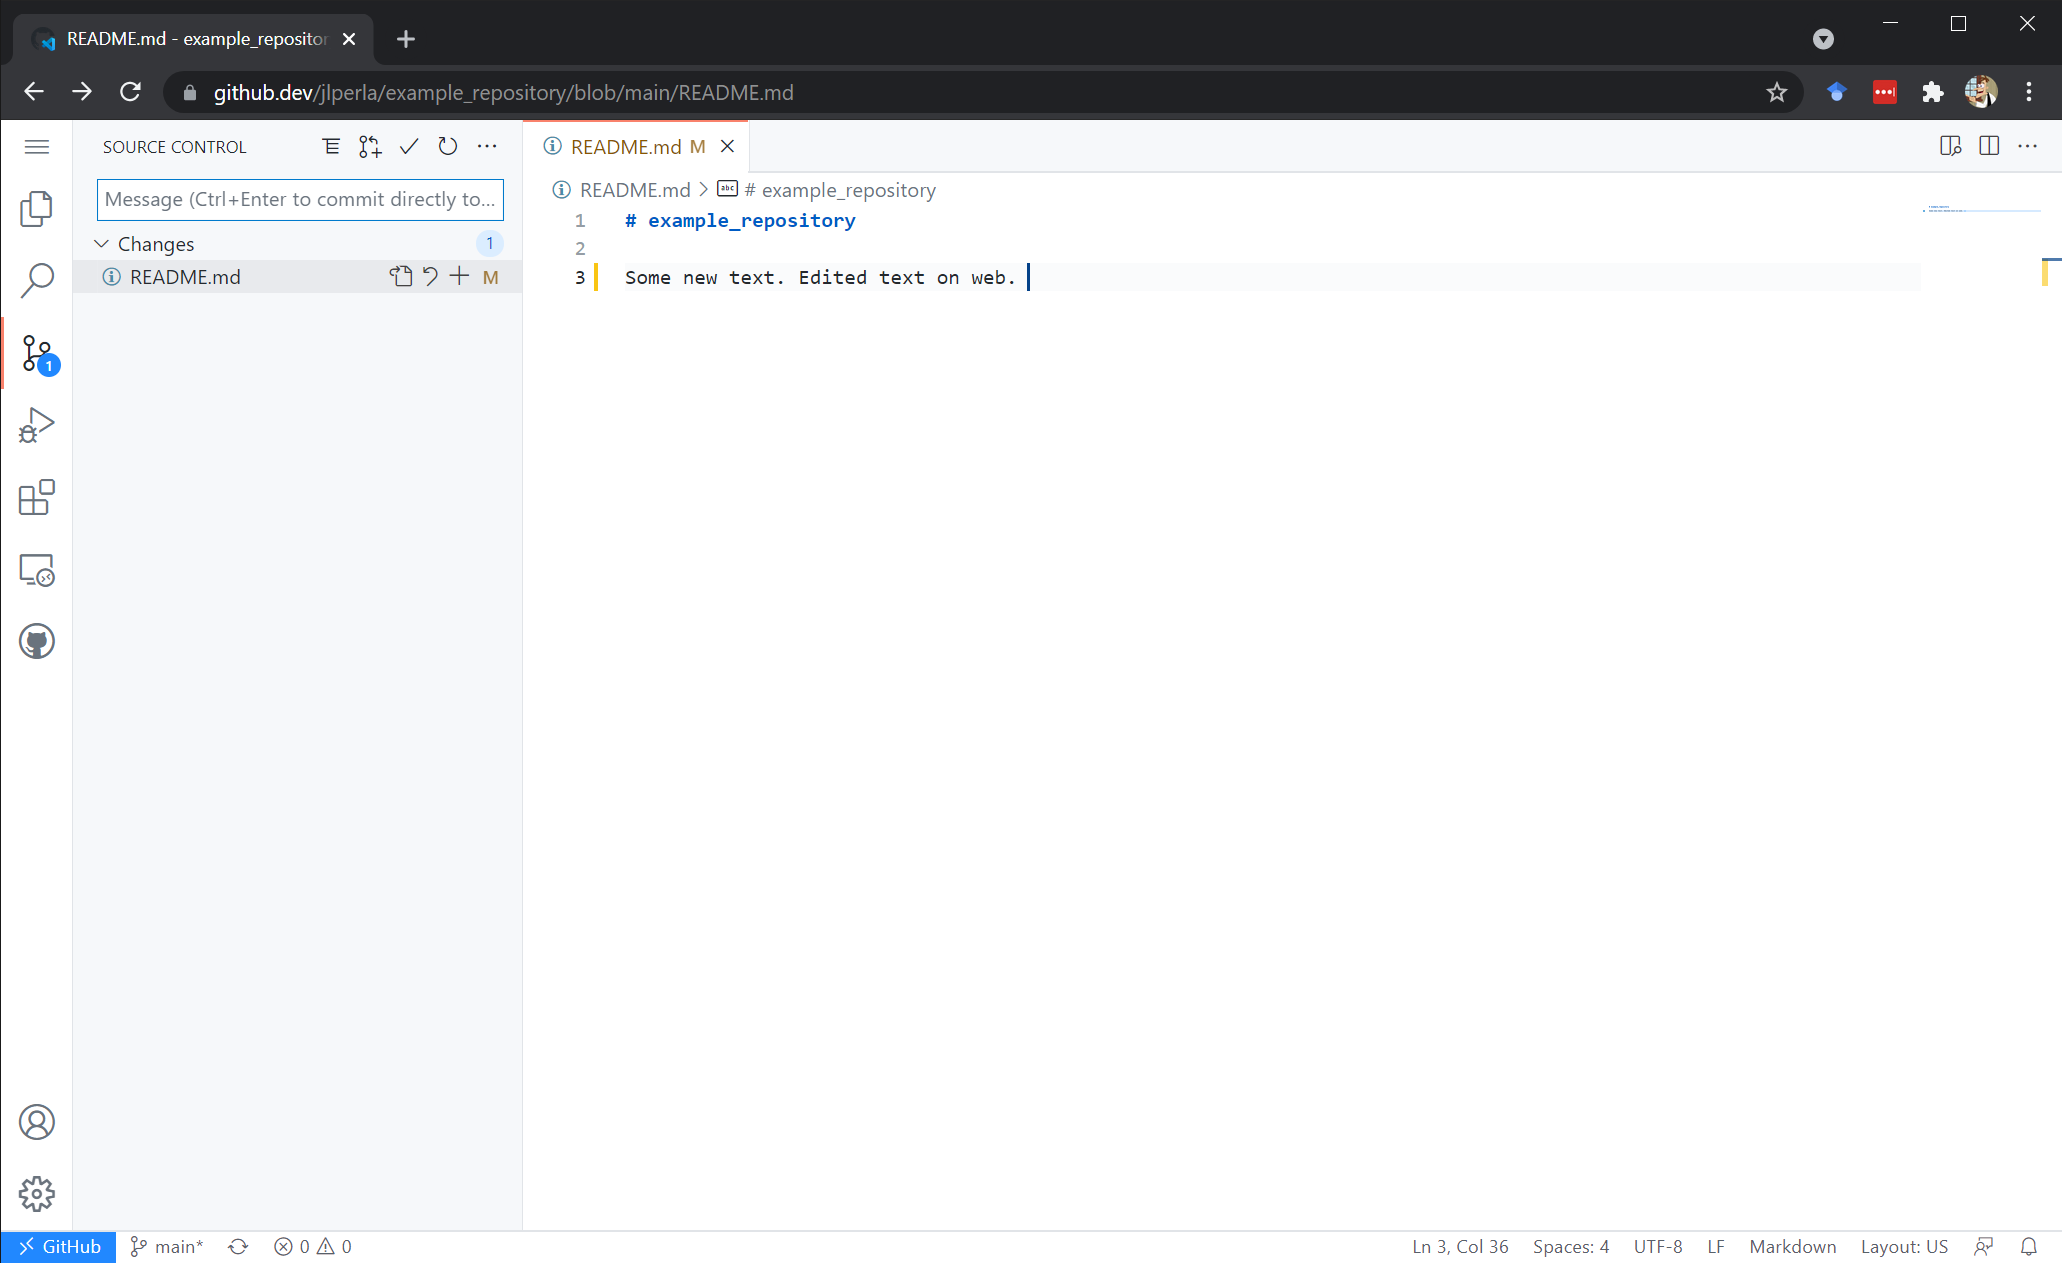
You can edit this online by choosing the pen icon, or on some platforms by just typing a . and it will open in an online version of VS Code on that repository (which can also be accessed by a change in the url from github.com to github.dev, e.g. https://github.come/USERNAME/example_repository/blob/main/README.md to https://github.dev/USERNAME/example_repository/blob/main/README.md)
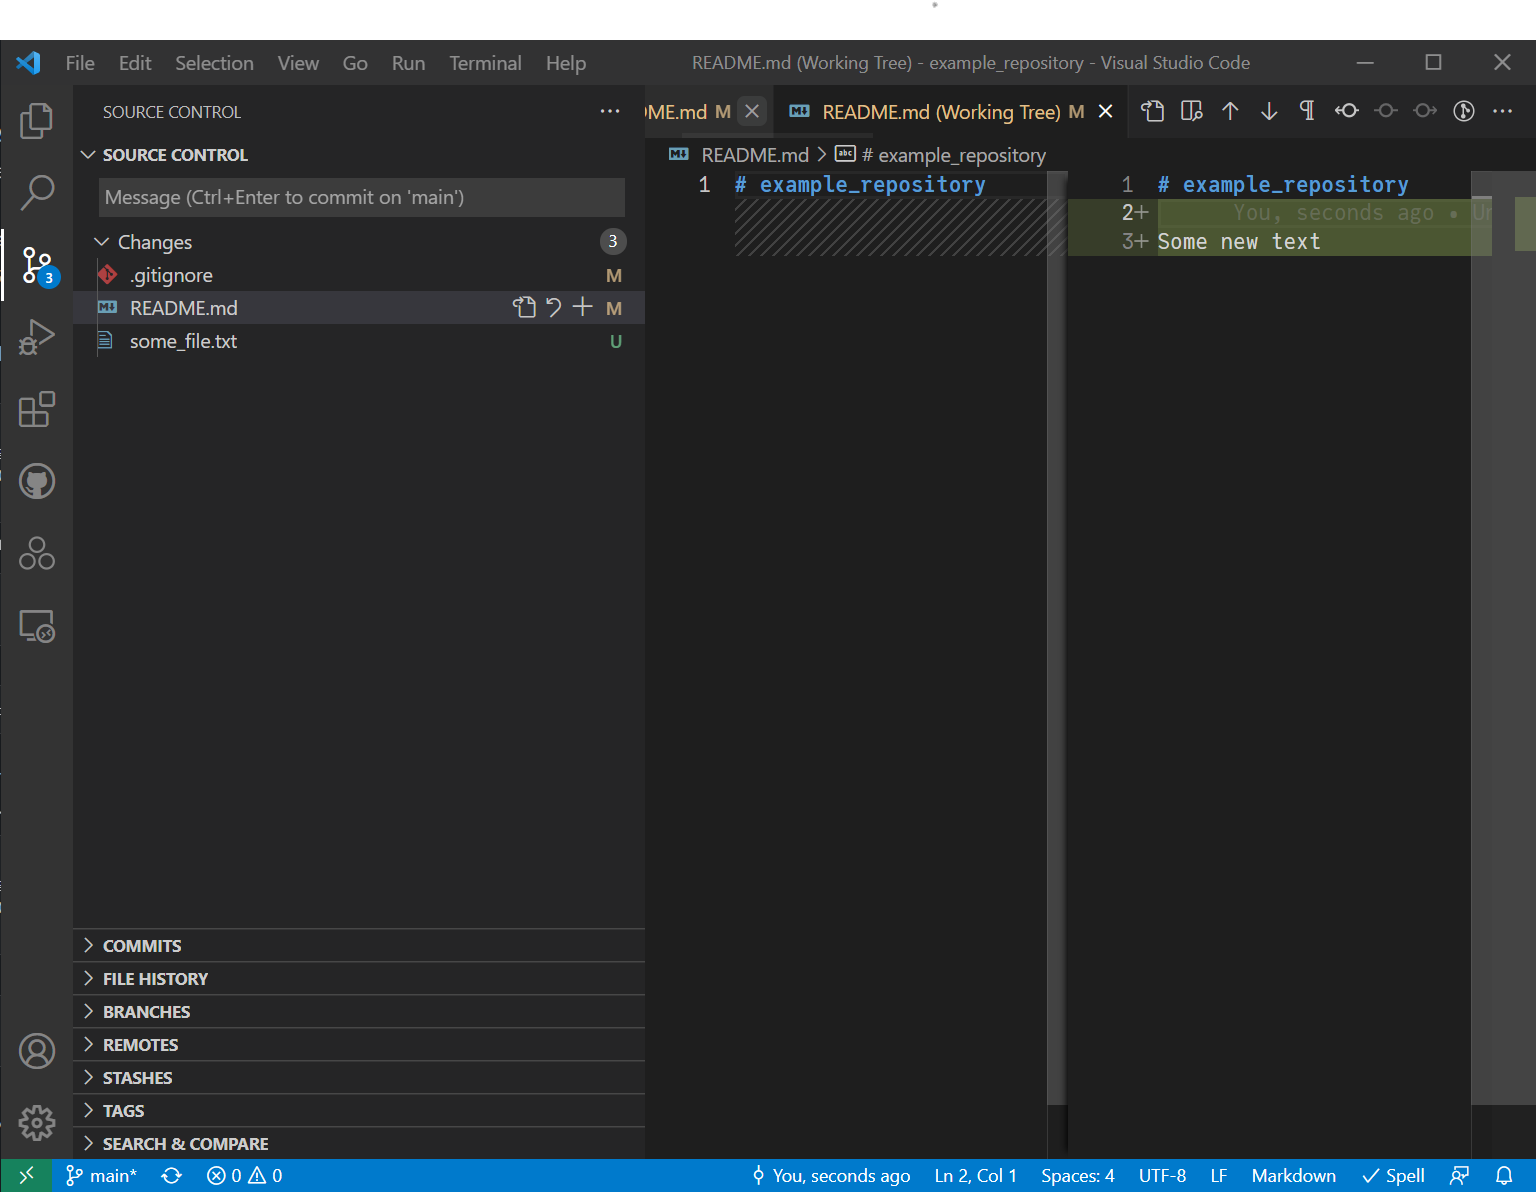
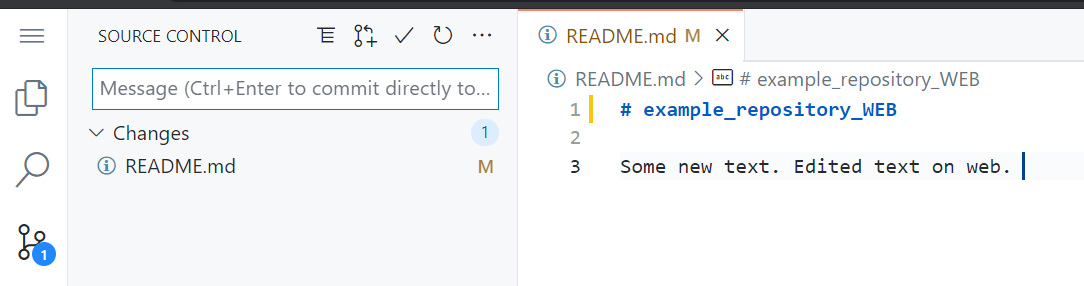
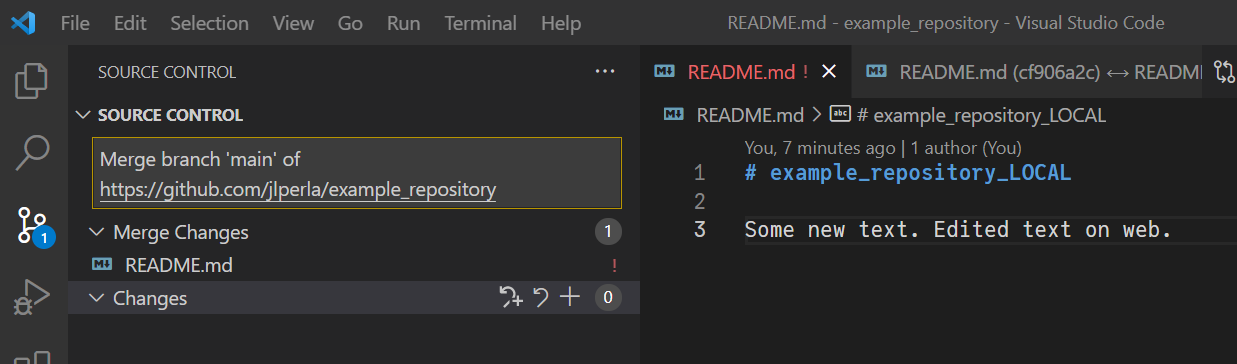
Here is what that UI looks like in that case after editing the text and choosing the Git pane on the webpage (just as in any other VS Code installation)
As with the desktop VS Code, we then need to commit this with a message. However, as it is online you will not be able to have local changes, and it commits without a manual “Push”.
Go back to the desktop VS Code, and you will see that the Git bar at the bottom now shows an incoming change.

Notice that the direction of the arrow is the opposite of when we made local modifications. Whereas moving local commits to the server is called a “Push”, bringing external changes down to your desktop is called a “Pull”.
But before we pull these changes, we will show how Git can automatically merge them (often on the same file, but at different lines of code).
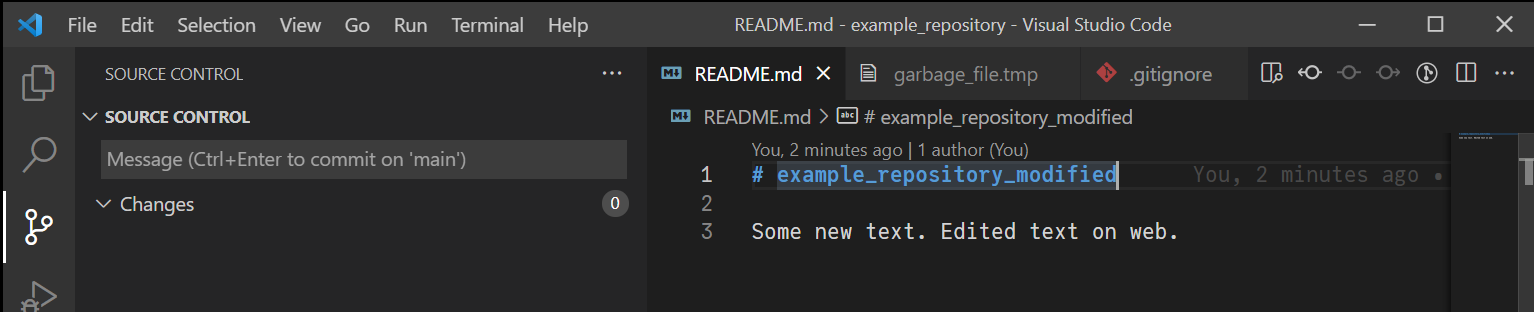
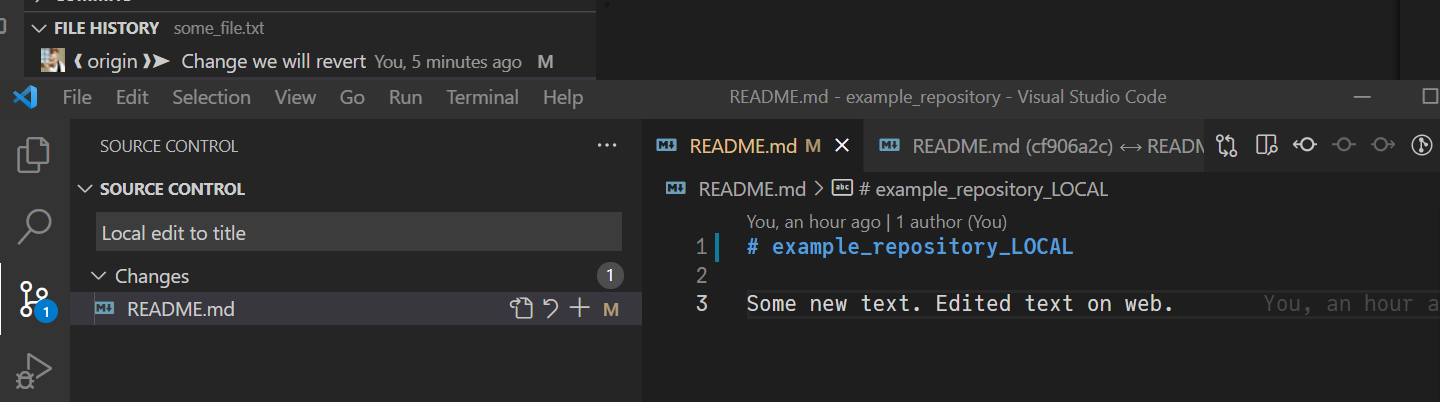
On your local VS Code, open the README.txt and change the title from # example_repository to # example_repository_modified. Then save and commit this change with a commit message such as Local Modification. It is important that you modified the top line, and not the same one that you changed in the online editor.
You will notice that at the bottom it now shows one commit coming from the server, and one going back up.
Now click on that icon on the bottom of the VS Code editor, which will do a Pull and Push of these changes. Assuming that you were careful not to modify the same line of code, it will determine that these two changes do not clash, and both commits will be added locally and on the server.
12.3.6. Discarding Changes#
A common scenario with Git is that you are making temporary local modifications and want to discard them prior to updating from the server.
Note
The .gitignore is very useful for ensuring that some files are always ignored. For example, temporary files in computations or .pdf files which coauthors will compile themselves (or having them automatically compiled with a GitHub Action).
To see this workflow prior to making a commit:
Save a change to the
README.mdOpen the Git pane, which will show the one modification.
Right click on the modification you wish to discard (can be file-by-file).
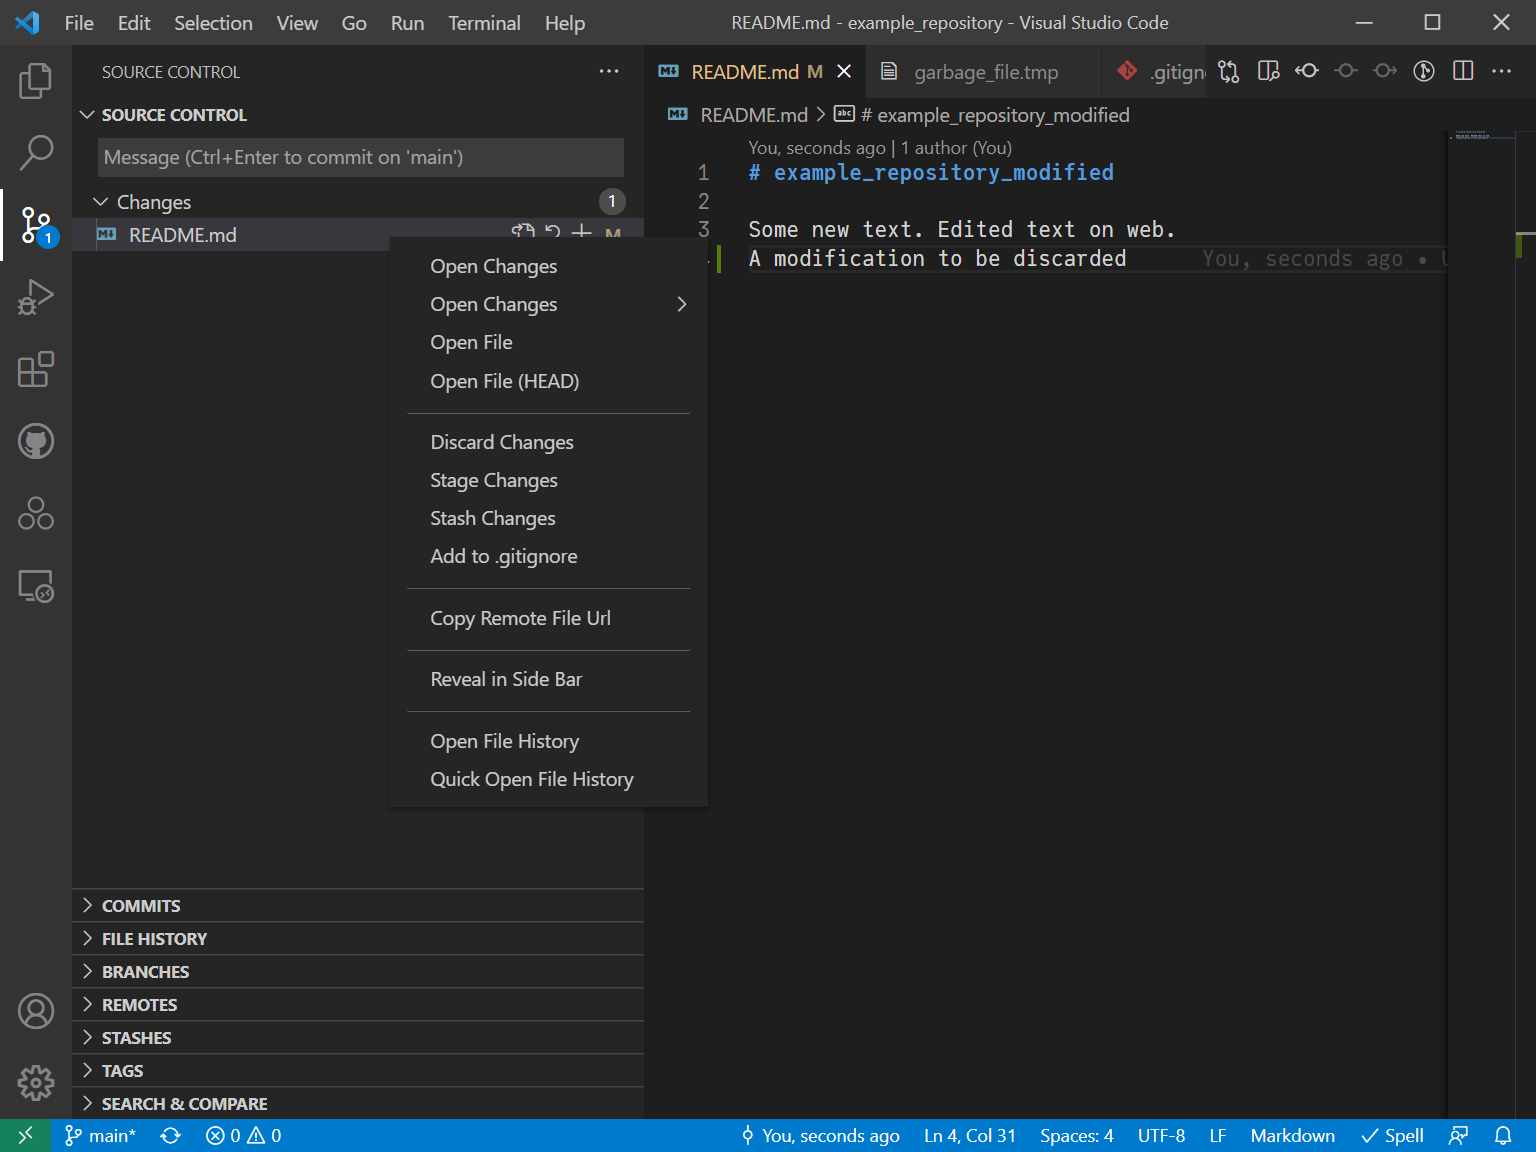
By selecting Discard Changes you can revert back to the last commit that had been made without any local modifications.
12.3.7. Reverting Commits#
On the other hand, if you have already made a commit, then there is a record of this change in the history which cannot be removed directly. You can, however, easily revert back that particular change.
For example, open some_file.txt, make a change, and commit/push the modification.
To restore an older version, with GitLens installed, go to the FILE HISTORY in the source control pane, and right click on the older version you wish to keep.
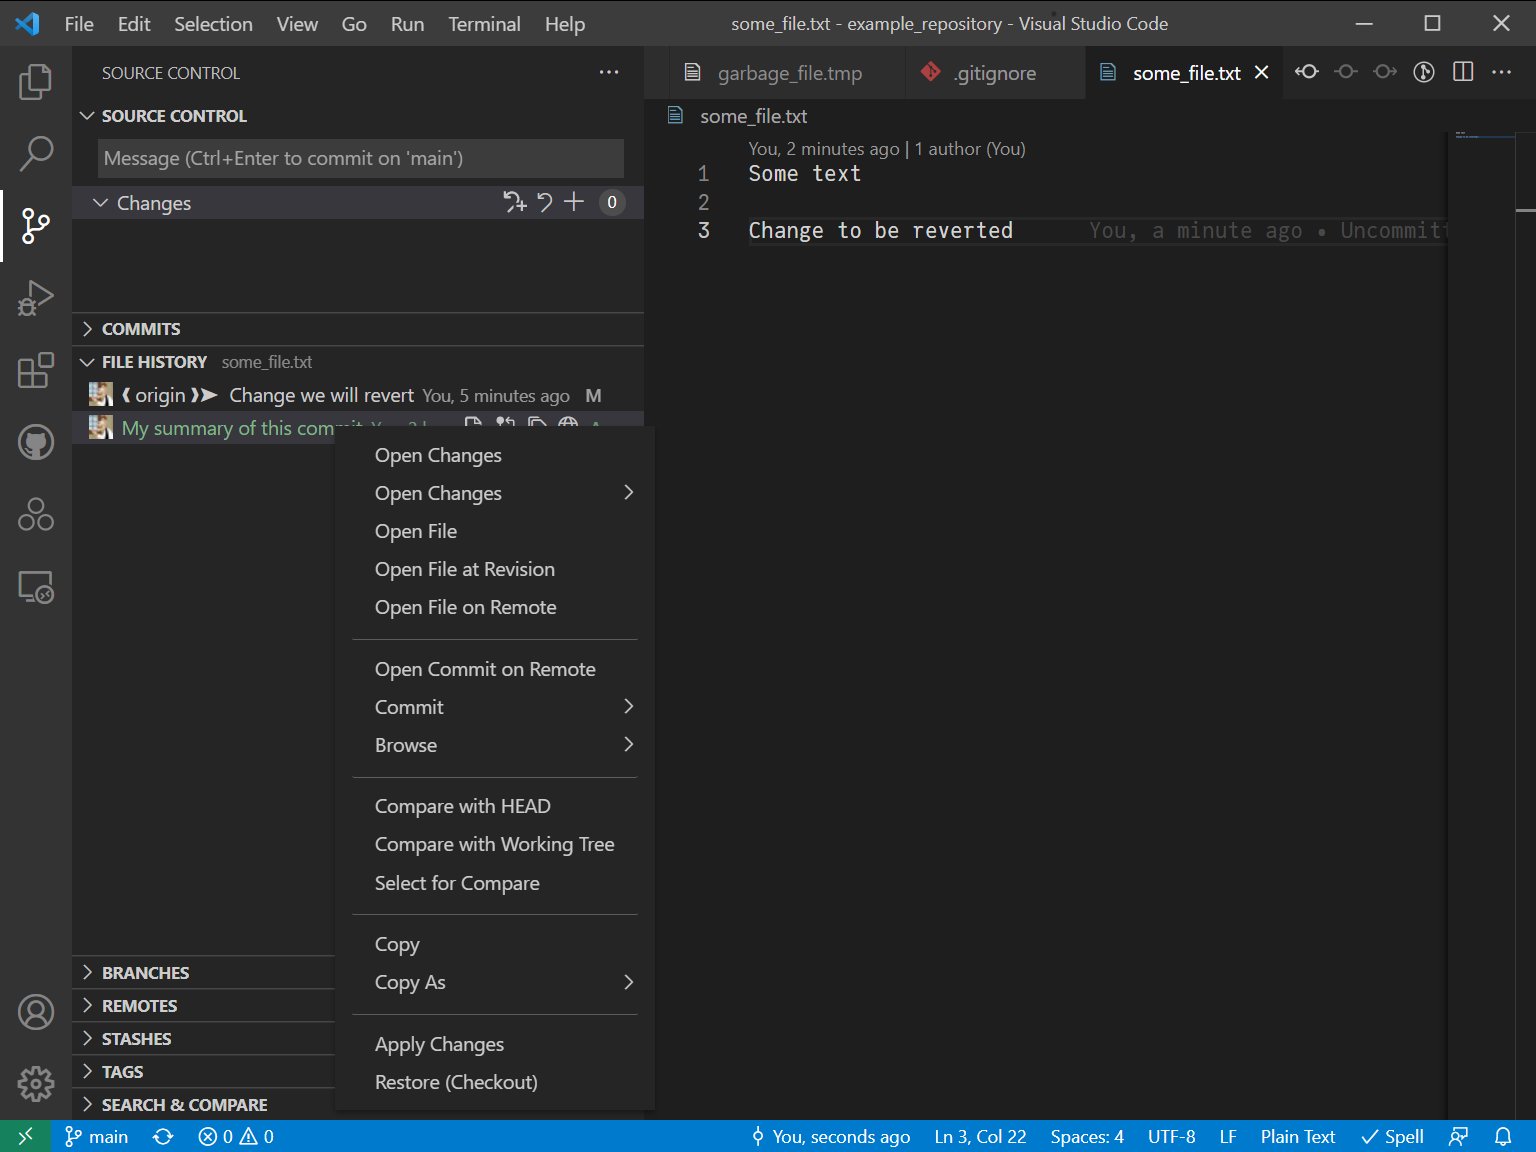
Choose Restore (Checkout), which will add a modification into the Staged Changes.
Then provide a commit message, and push to the server.
This will not remove the history of the older commit, but will instead produce the opposite changes required to restore it.
See the VS Code documentation for more features.
12.3.8. Merge Conflicts#
While in the previous examples, we showed with the online editor how we could make external changes and Git would automatically merge them if possible, other times it will not be possible.
To demonstrate this, follow the same instructions to modify the top line in the README.md with the online editor, and commit the change
Then in your desktop, change the same line of code and commit it, but don’t push the change
As before, at the bottom of the window, it shows a commit going to the server, and another coming down. Click on that button to push and pull the changes.
As expected, it was unable to automatically merge the changes, and requires manual intervention to merge.
It should bring you to the editor to deal with these merge conflicts

Since the change on the server occured before your local change, you will need to address this conflict before pushing your change. While you can manually modify the files, the user interface lets you navigate and choose which changes to accept.
In that view, choose “Accept Current Change” within the editing screen, and right above the line of code that is highlighted. This will use your local change and overwrite the one of the server. Or choose “Accept Incoming Change” to use the server’s version.
An alternative workflow is to right click on the file, and choose Accept All Current or Accept All Incoming to choose one version of the file without going through individual decisions.
After modifying:
Save the file if you have resolved the merge conflict.
Choose the
+next to the modified file in the source control pane, or right click on the file and chooseStage Changes.Add a commit message, commit the file
Do a Push to synchronize with the server.
See this youtube video for more details.
Note
An important “break-glass-in-emergency” feature with git is to completely revert all local changes and reset to the latest commit on the server.
To do this, in a terminal within the repository execute git reset --hard origin/main (or master if the primary branch is called master rather than main). But remember, this will erase all local changes, so back files up locally if required.
12.4. Collaborative Work#
We have already seen how Git features (e.g. automatic merging of changes, and tools to manage conflicts where it fails) provide tools for collaboration.
Here we will look at further GitHub and VS Code functionality to support collaboration.
12.4.1. Adding Collaborators#
First, add a collaborator to the USERNAME/example_repository lecture we created earlier.
We can do this by choosing Settings then Manage Access, and finally Invite a Collaborator.
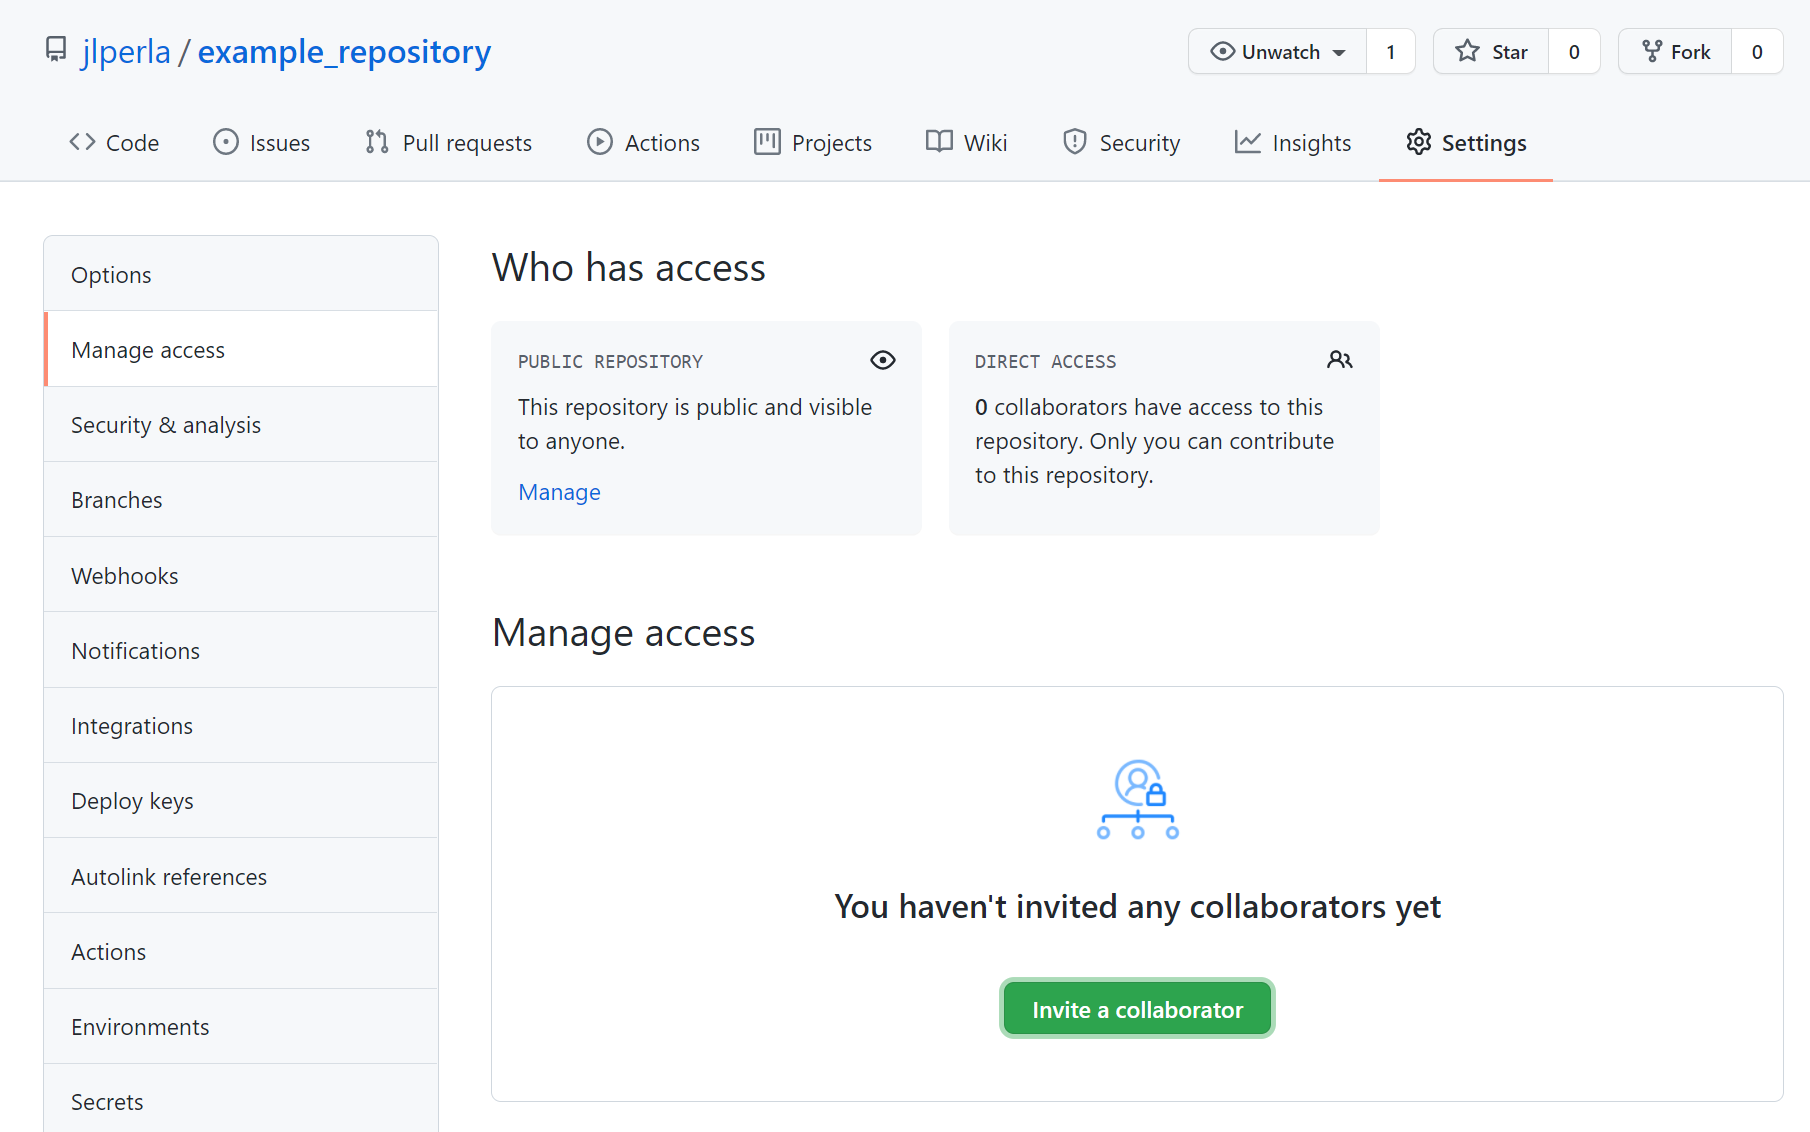
Adding someone as a collaborator is required for access to private repositories, and can allow them direct access to changing the repository for public ones.
12.4.2. Project Management#
In addition, having individuals as collaborators enables further project management features.
The main feature is an issue, which we can create from the issues tab.
You should see something like this
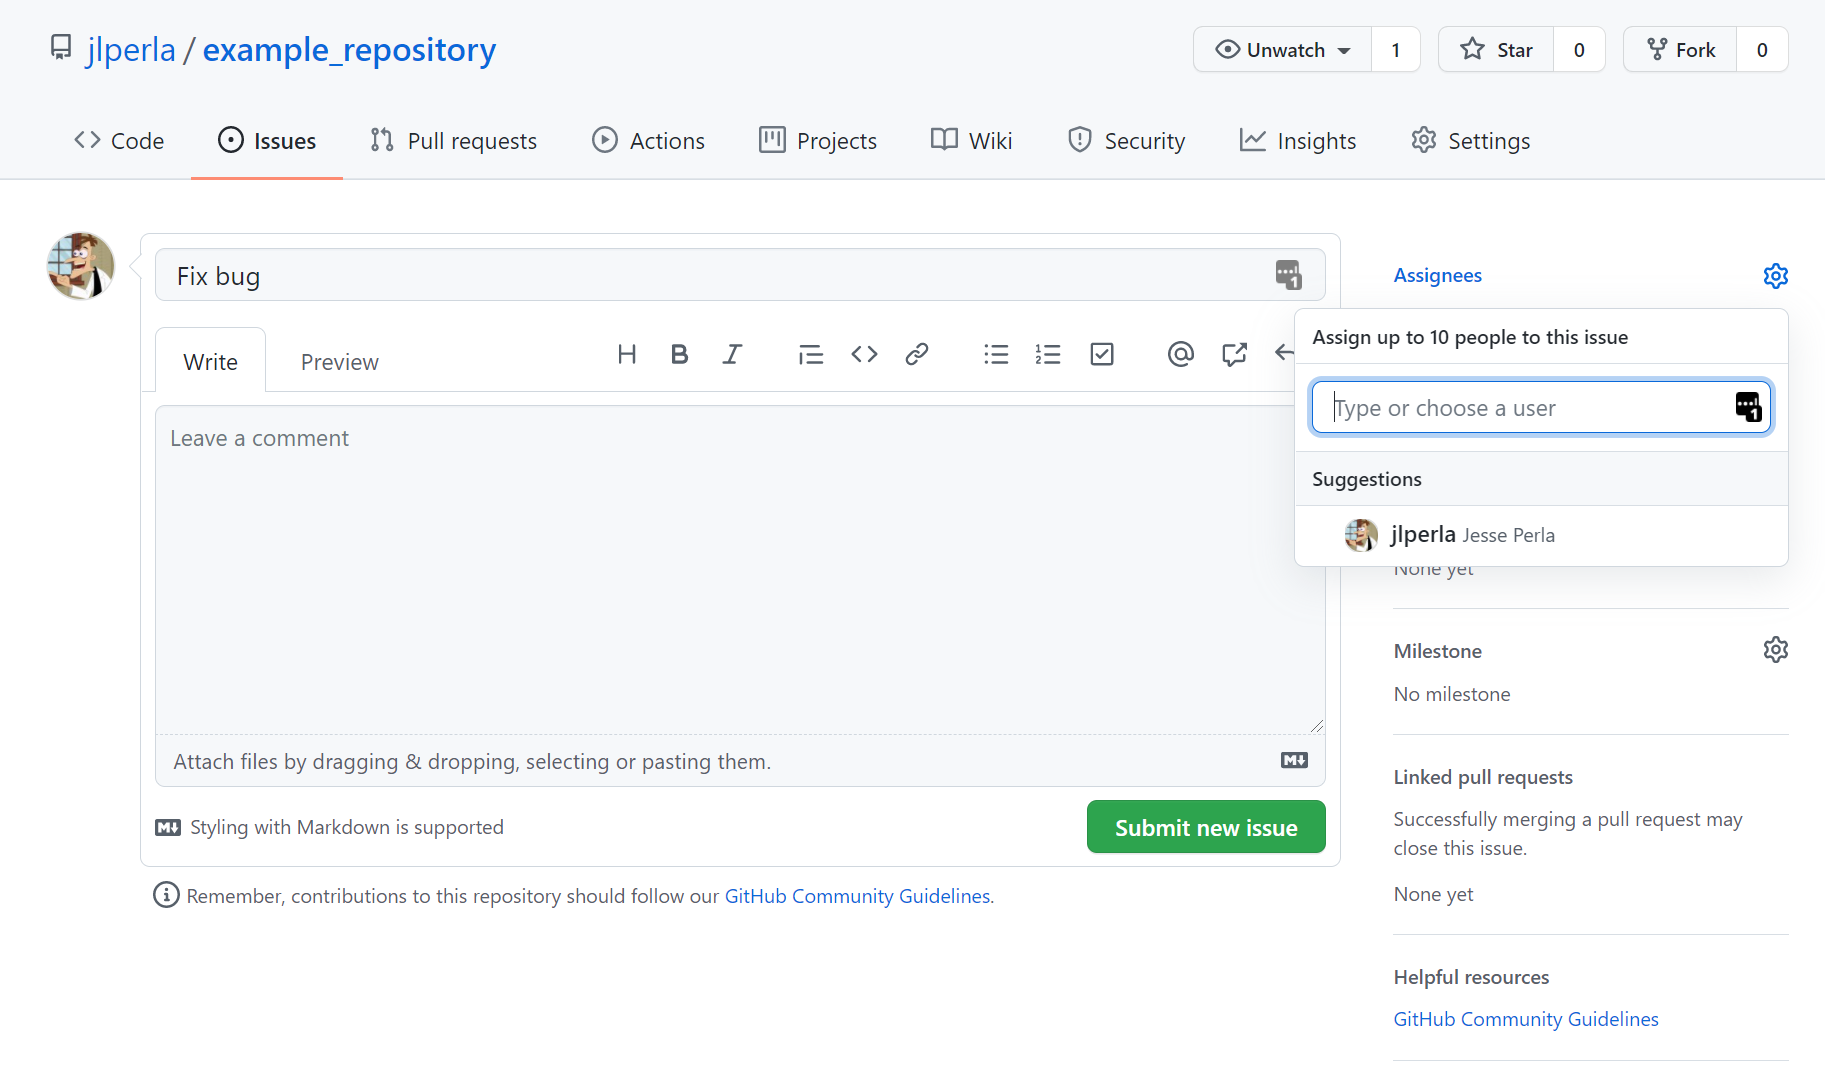
Let’s unpack the different components
The assignees dropdown optionally lets you select people tasked to work on the issue.
The labels dropdown lets you tag the issue with labels visible from the issues page, such as “high priority” or “feature request”.
It’s possible to tag other issues and collaborators (including in different repos) by linking to them in the comments – this is part of what’s called GitHub-Flavored Markdown.
You can see open issues at a glance from the general issues tab
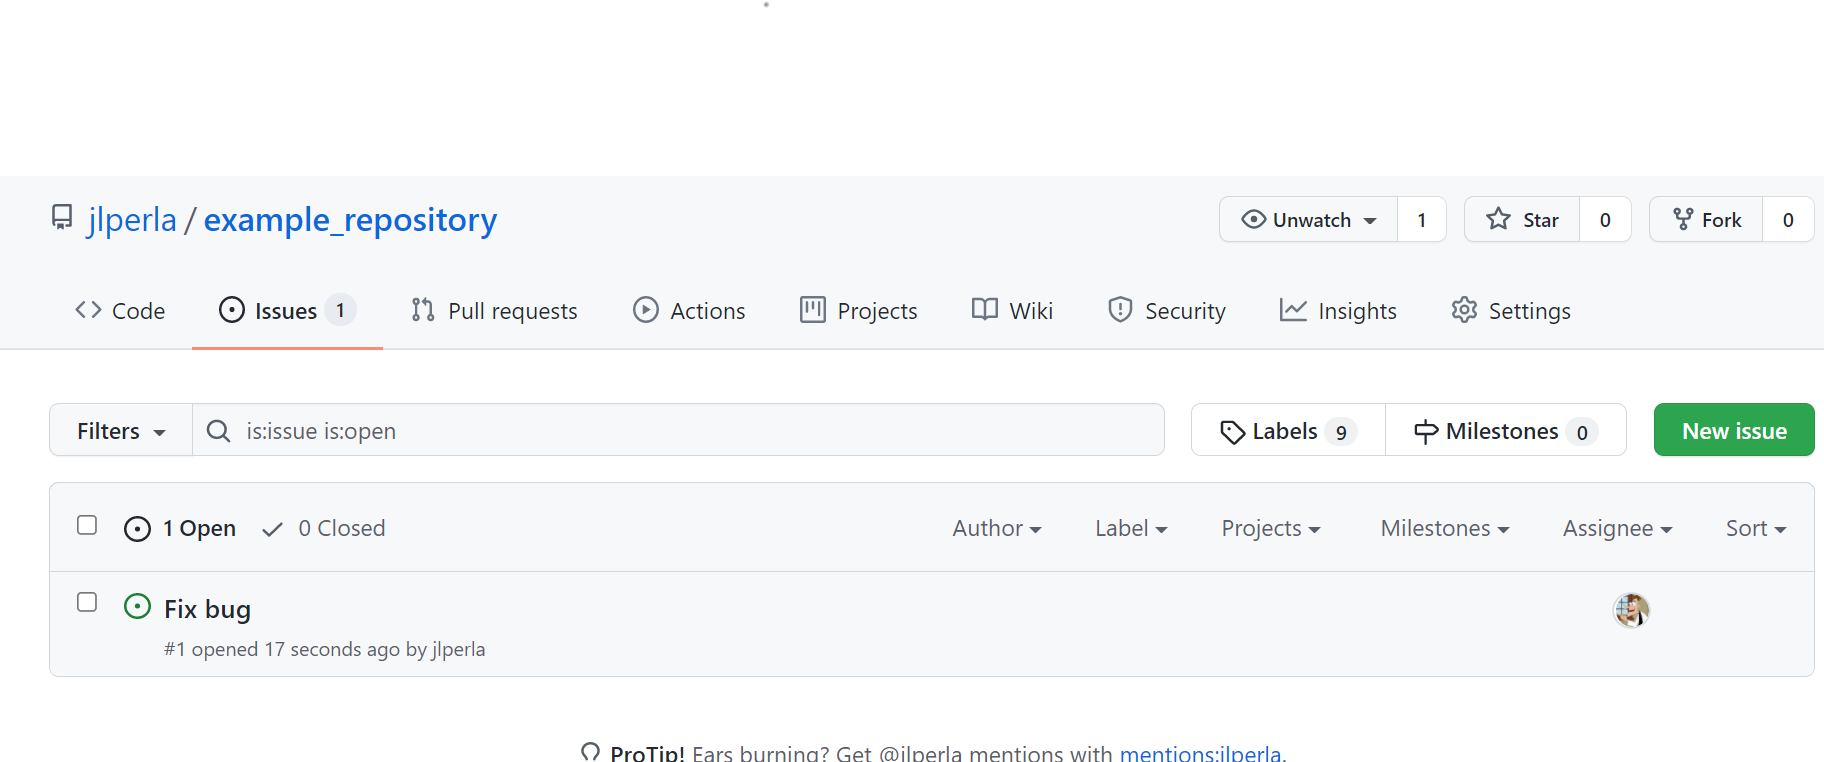
The checkboxes are common in GitHub to manage project tasks.
12.4.3. Reviewing Code#
Whenever people push to a project you’re working on, you’ll receive an email notification.
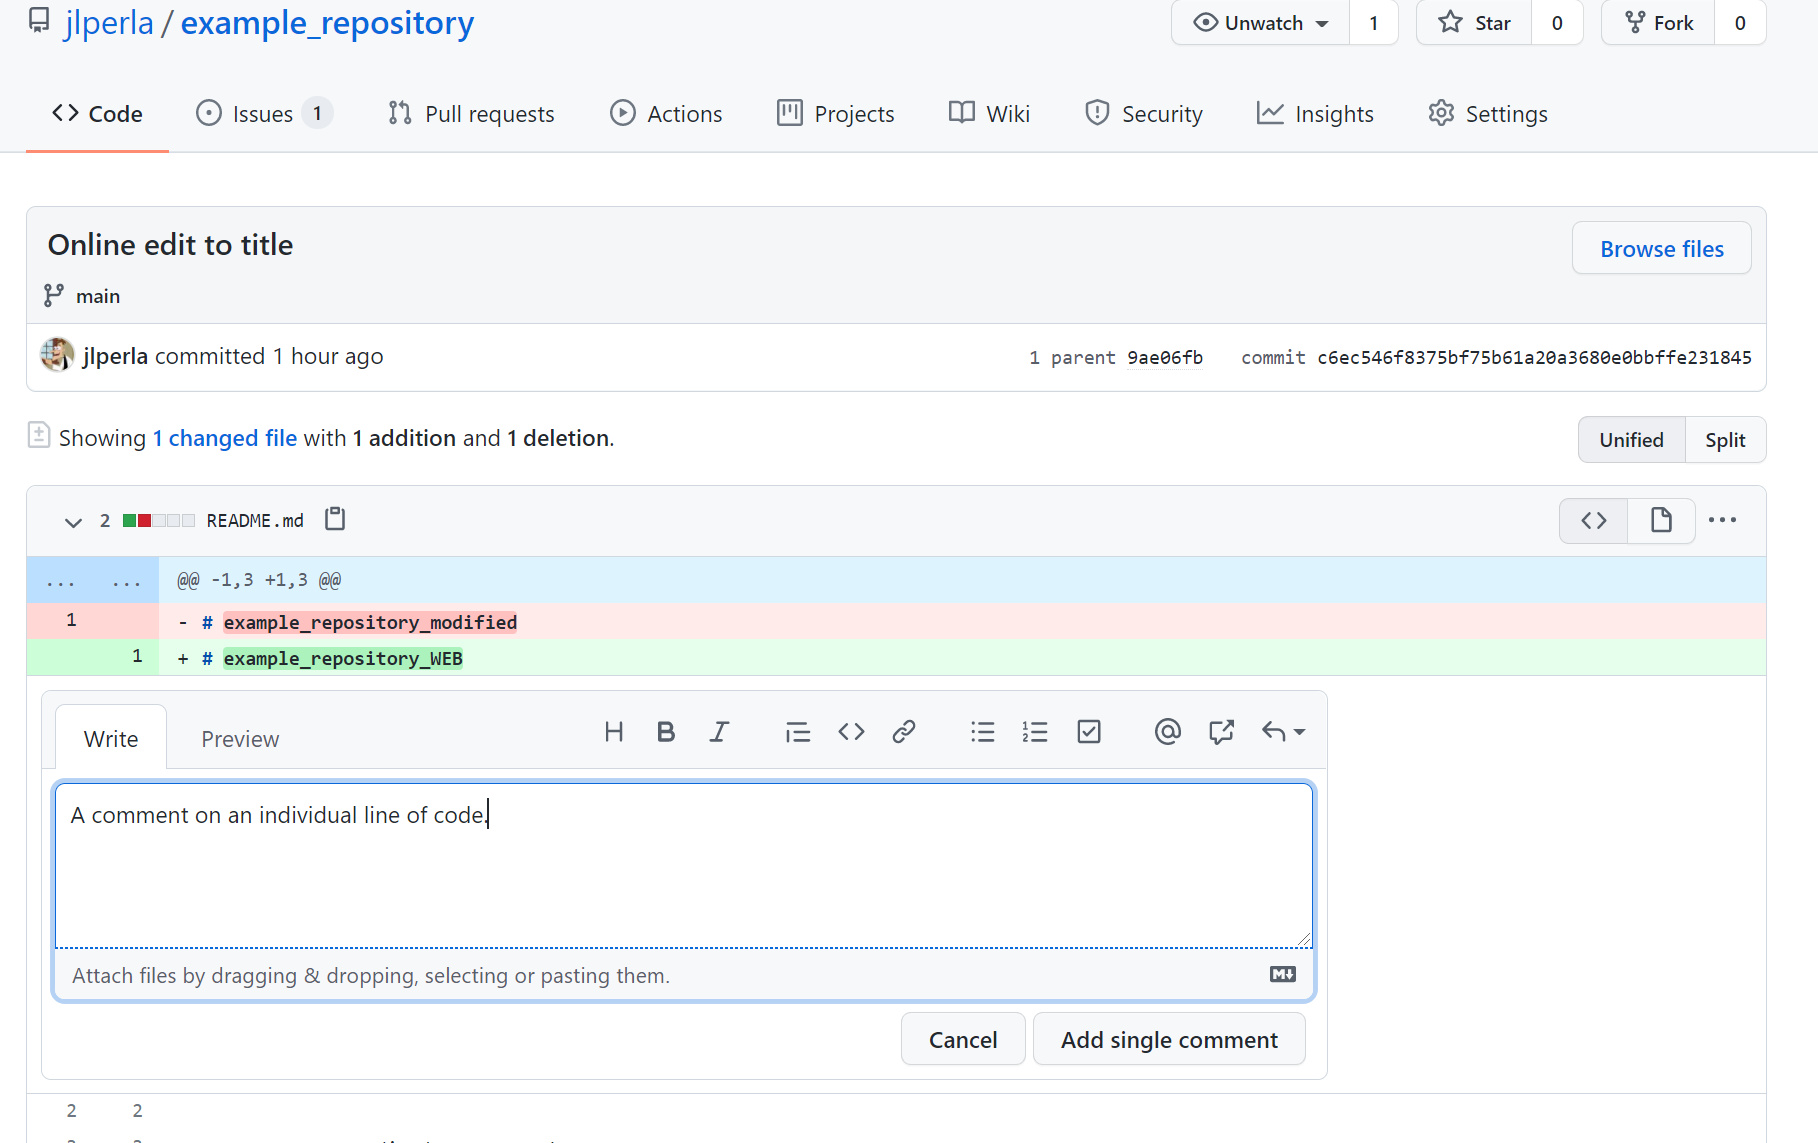
You review individual commits by opening a commits and commenting.
Or by clicking on the line number in the description of the commit differences to have discussions about a specific line of code. Throughout, if you have a collaborator, you can refer to them by @username replacing username with their GitHub name.
12.5. Collaboration via Pull Request#
One of the defining features of GitHub is that it is the dominant platform for open source code, which anyone can access and use.
However, while anyone can make a copy of the source code, not everyone has access to modify the particular version stored on GitHub.
A maintainer (i.e. someone with “write” access to directly modify a repository) might consider different contributions and “merge” the changes into the main repository if the changes meet their criteria.
A pull request (“PR”) allows any outsiders to suggest changes to open source repositories.
A PR requests the project maintainer to merge (“pull”) changes you’ve worked on into their repository.
There are a few different workflows for creating and handling PRs, which we’ll walk through below.
Note: If the changes are for a Julia Package, you will need to follow a different workflow – described in the testing lecture.
12.5.1. Quick Fixes#
GitHub’s website provides an online editor for quick and dirty changes, such as fixing typos in documentation.
For example, you can navigate to the source for these lecture notes in QuantEcon/lecture-julia.myst and navigate to the README.md.
From there, either click the small pencil to the upper right of the text or type . to launch the web editor (which launches the web editor with https://github.dev/QuantEcon/lecture-julia.myst/blob/main/README.md).
For example, choosing the pencil might look like
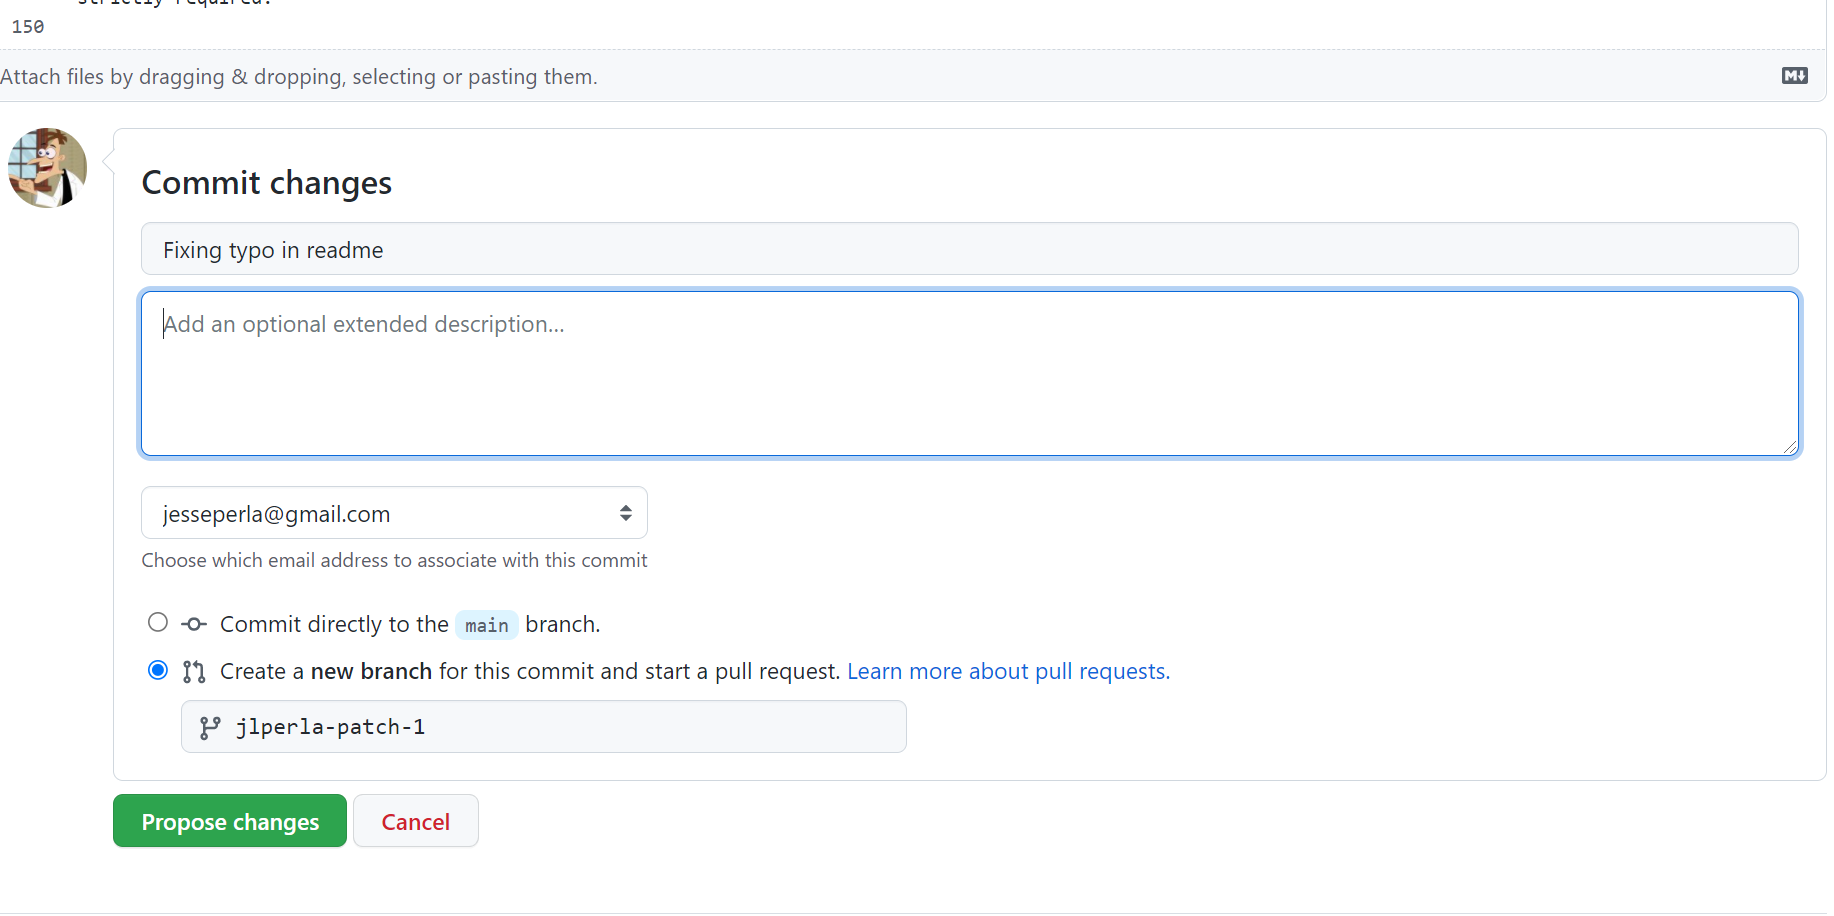
Where you can give the name for the new branch and provide a description of your changes for review by maintainers.
This will create a “fork” of the entire repository, make your change as a commit, and then upload this change to the repository you have forked from (i.e., the Pull Request).
But what if we want to make more in-depth changes?
12.5.2. No-Access Case#
A common problem is when we don’t have write access (i.e. we can’t directly modify) the repo in question.
In that case, click the “Fork” button that lives in the top-right of every repo’s main page.
This will copy the repo into your own GitHub account.
For example, we can fork the source for these lectures from this repo to our own account (e.g. to https://github.com/USERNAME/lecture-julia.myst).
In fact, if you created a PR for a change in the web GUI, it may already be forked to your account.
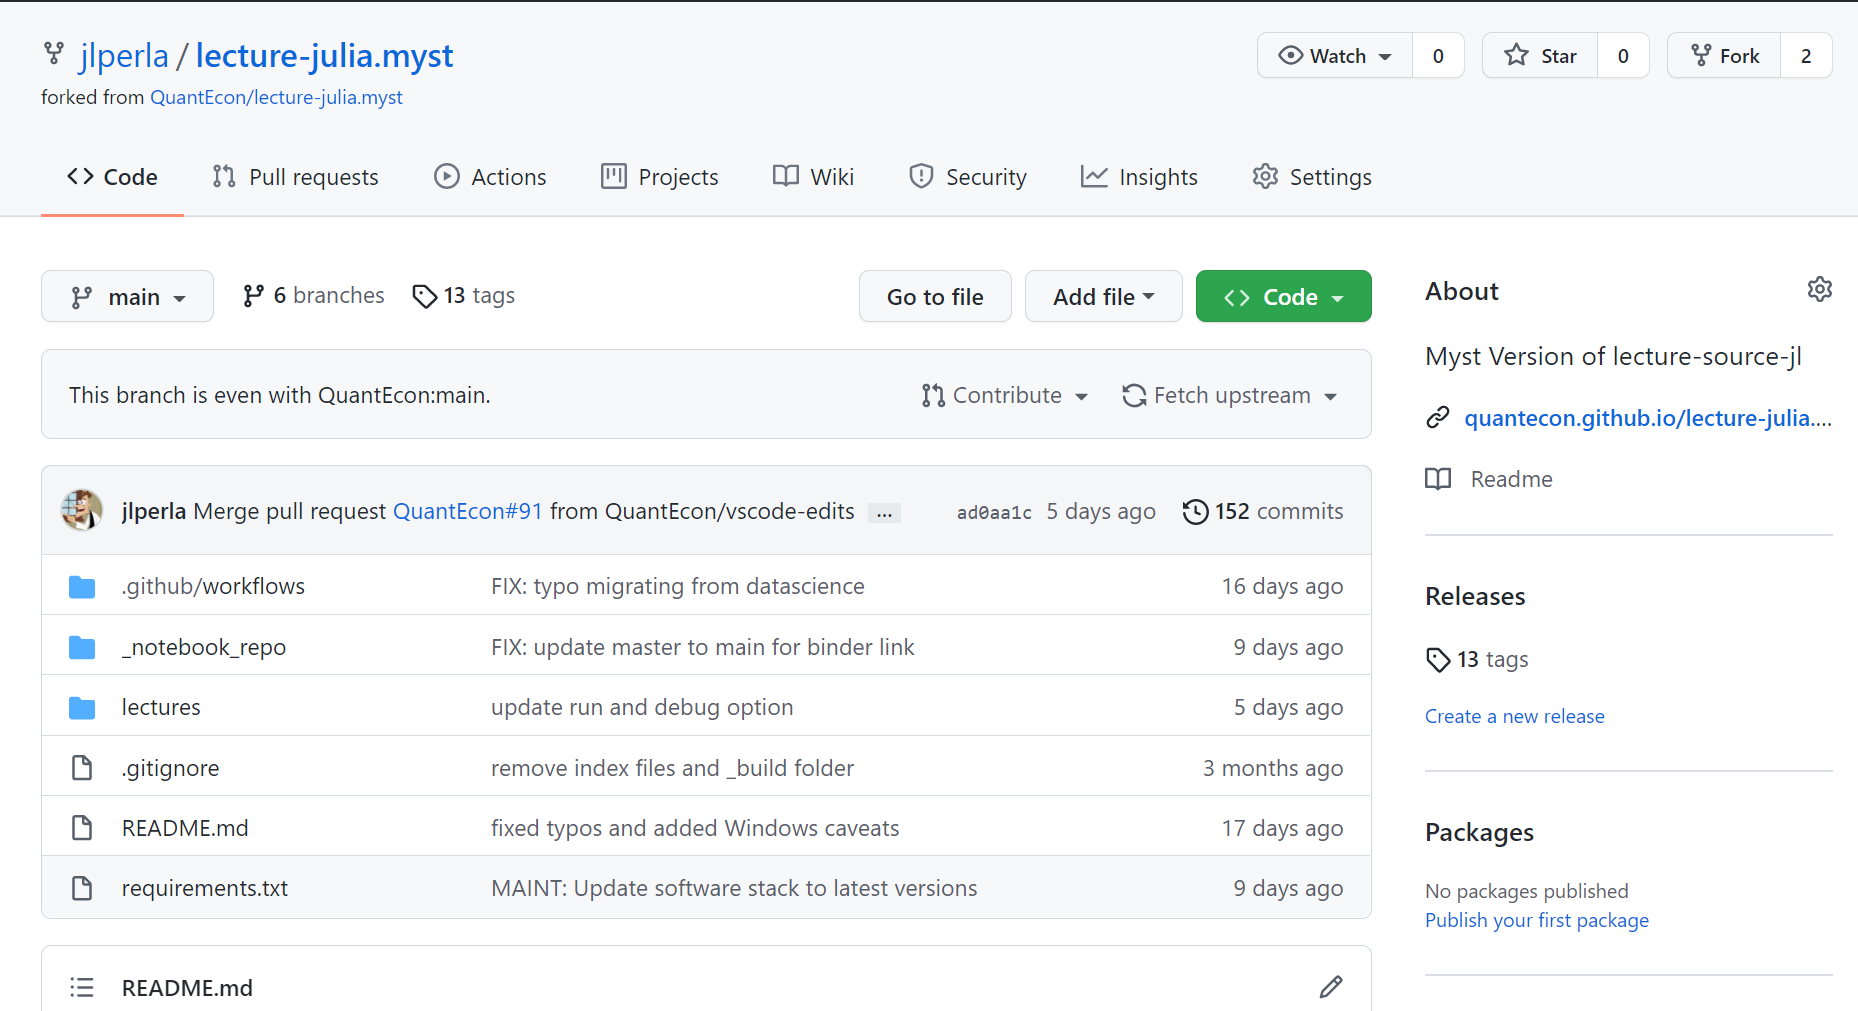
Regardless, you should have a new repository in your account with the same name but different URL, along with a special icon to indicate that it’s a fork. It will also say where it is forked from, and summarize the number of commits that are different.
We then can clone this repository to our desktop. Follow the instructions to clone the forked repository to your desktop (e.g. in VS Code, > Git: Clone, then choose https://github.com/USERNAME/lecture-julia.myst.git for your account, and then Open in New Window).
In order to more easily manage changes, we need to create a new branch. Branches are a separate sequence of commits that diverge from the main branch at some point (and may later be merged back in). It allows you to manage a sequence of separate changes as a coherent unit.
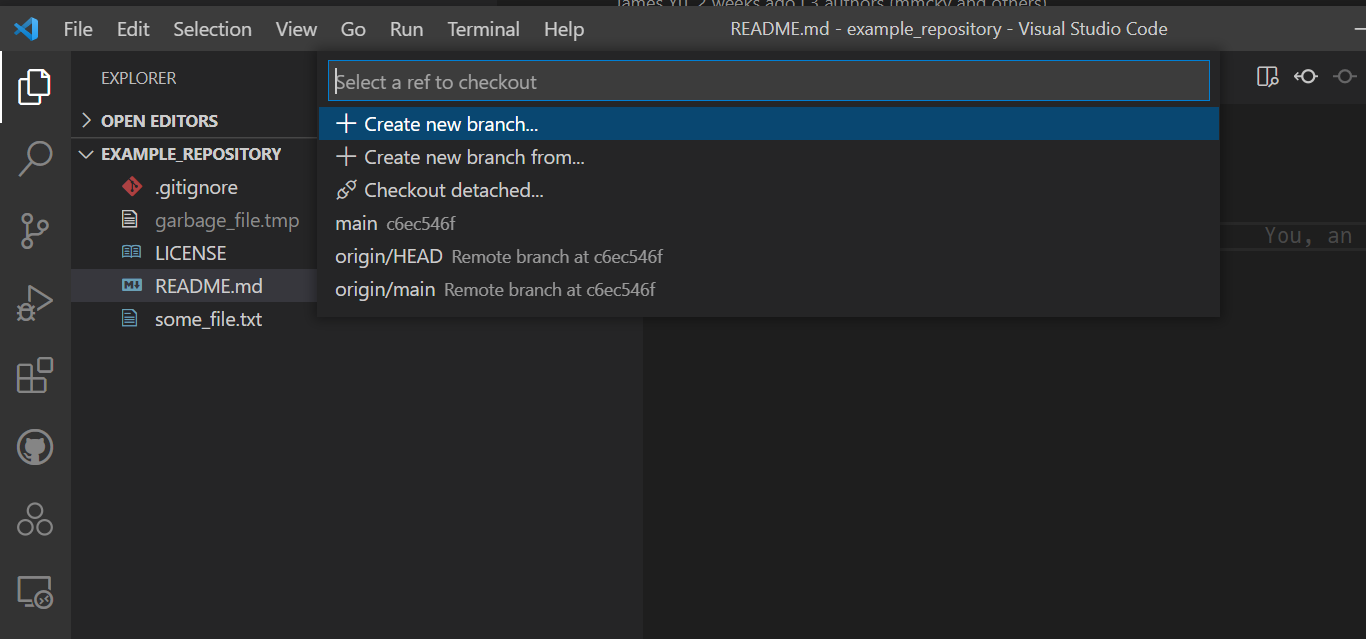
Click on the bottom left of the screen where it says main to create or select a new branch, and then choose New Branch and title it readme-mod.

You will note that the bottom left hand corner now has chosen that branch rather than the main one. You can use that to easily switch between them in the editor.

Open the README.md file and make a change to it in the branch, then save and commit with a message. At this point, the branch and your commit are still only local.
To push onto the server, choose the arrow next to the branch name to publish changes.
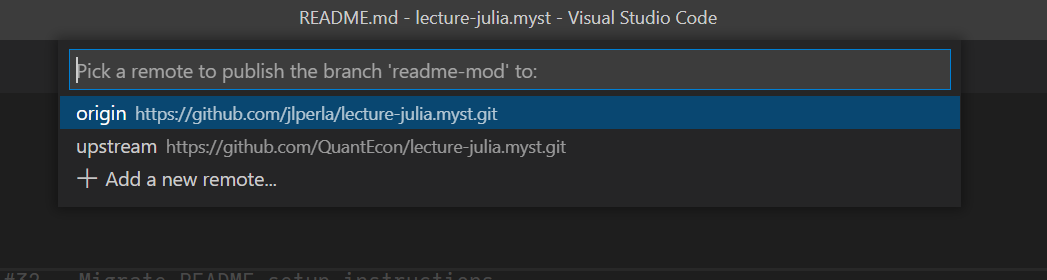
At this point, you can choose whether you want this branch to be related to the origin (i.e., your fork) or the original repository upstream. Since this is intended to propose a change to the public repository, you should choose upstream.
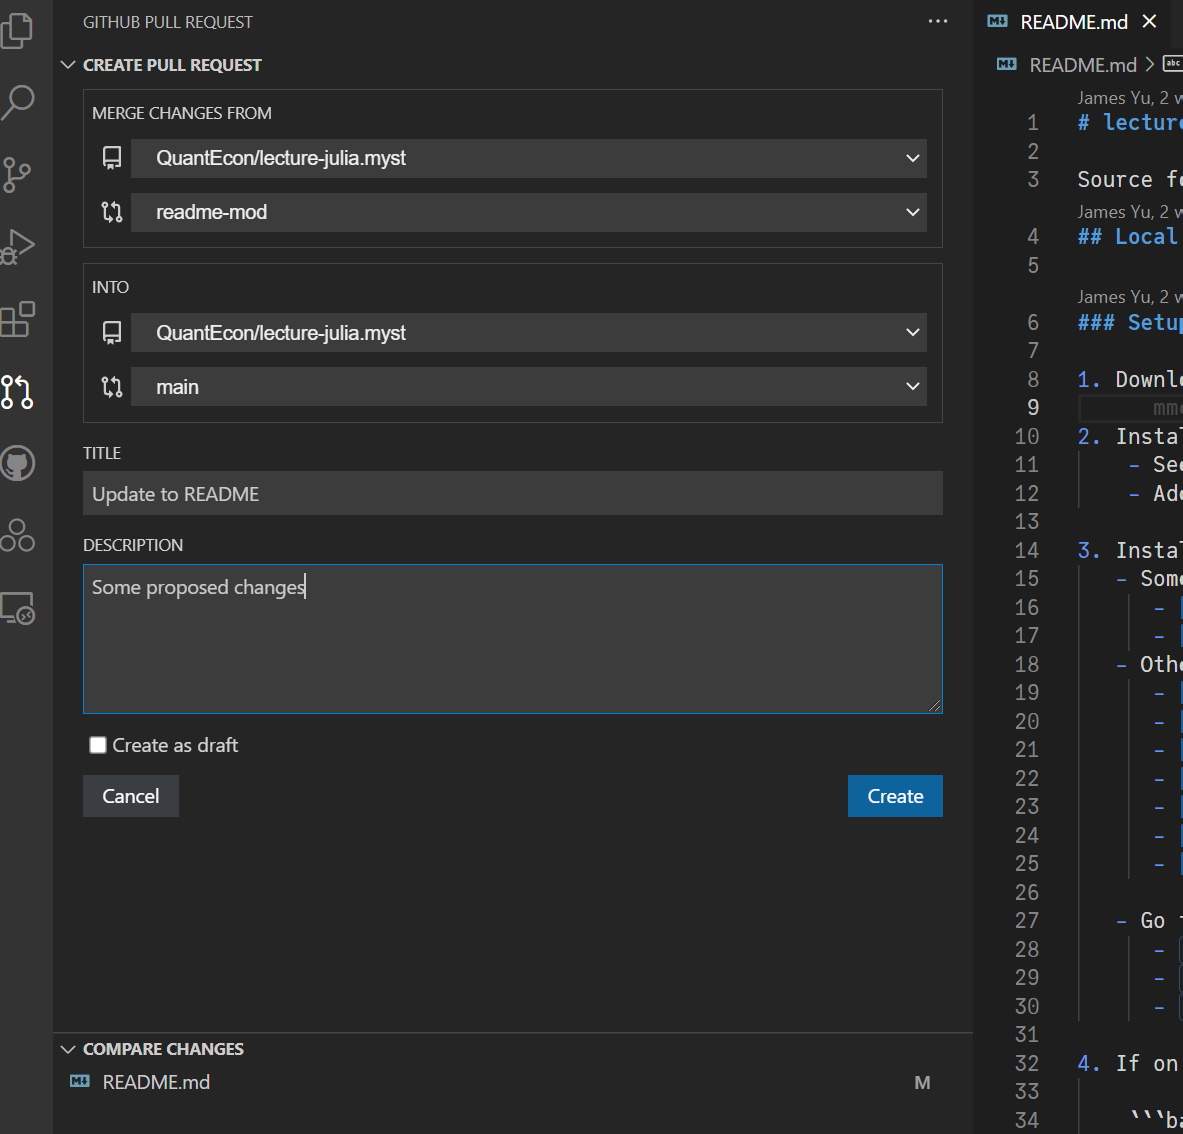
After selecting, it will ask you whether you want to create a Pull Request. Choose Yes, and then fill in the information for the new pull request and Create it.
You can Exit Review Mode after it has been created at which point it may switch to your main branch.
Use the branch selection on the lower left hand of the editor to change branches as you wish.
Finally, for the original repository you forked from, they will now see this as a proposed change, as below
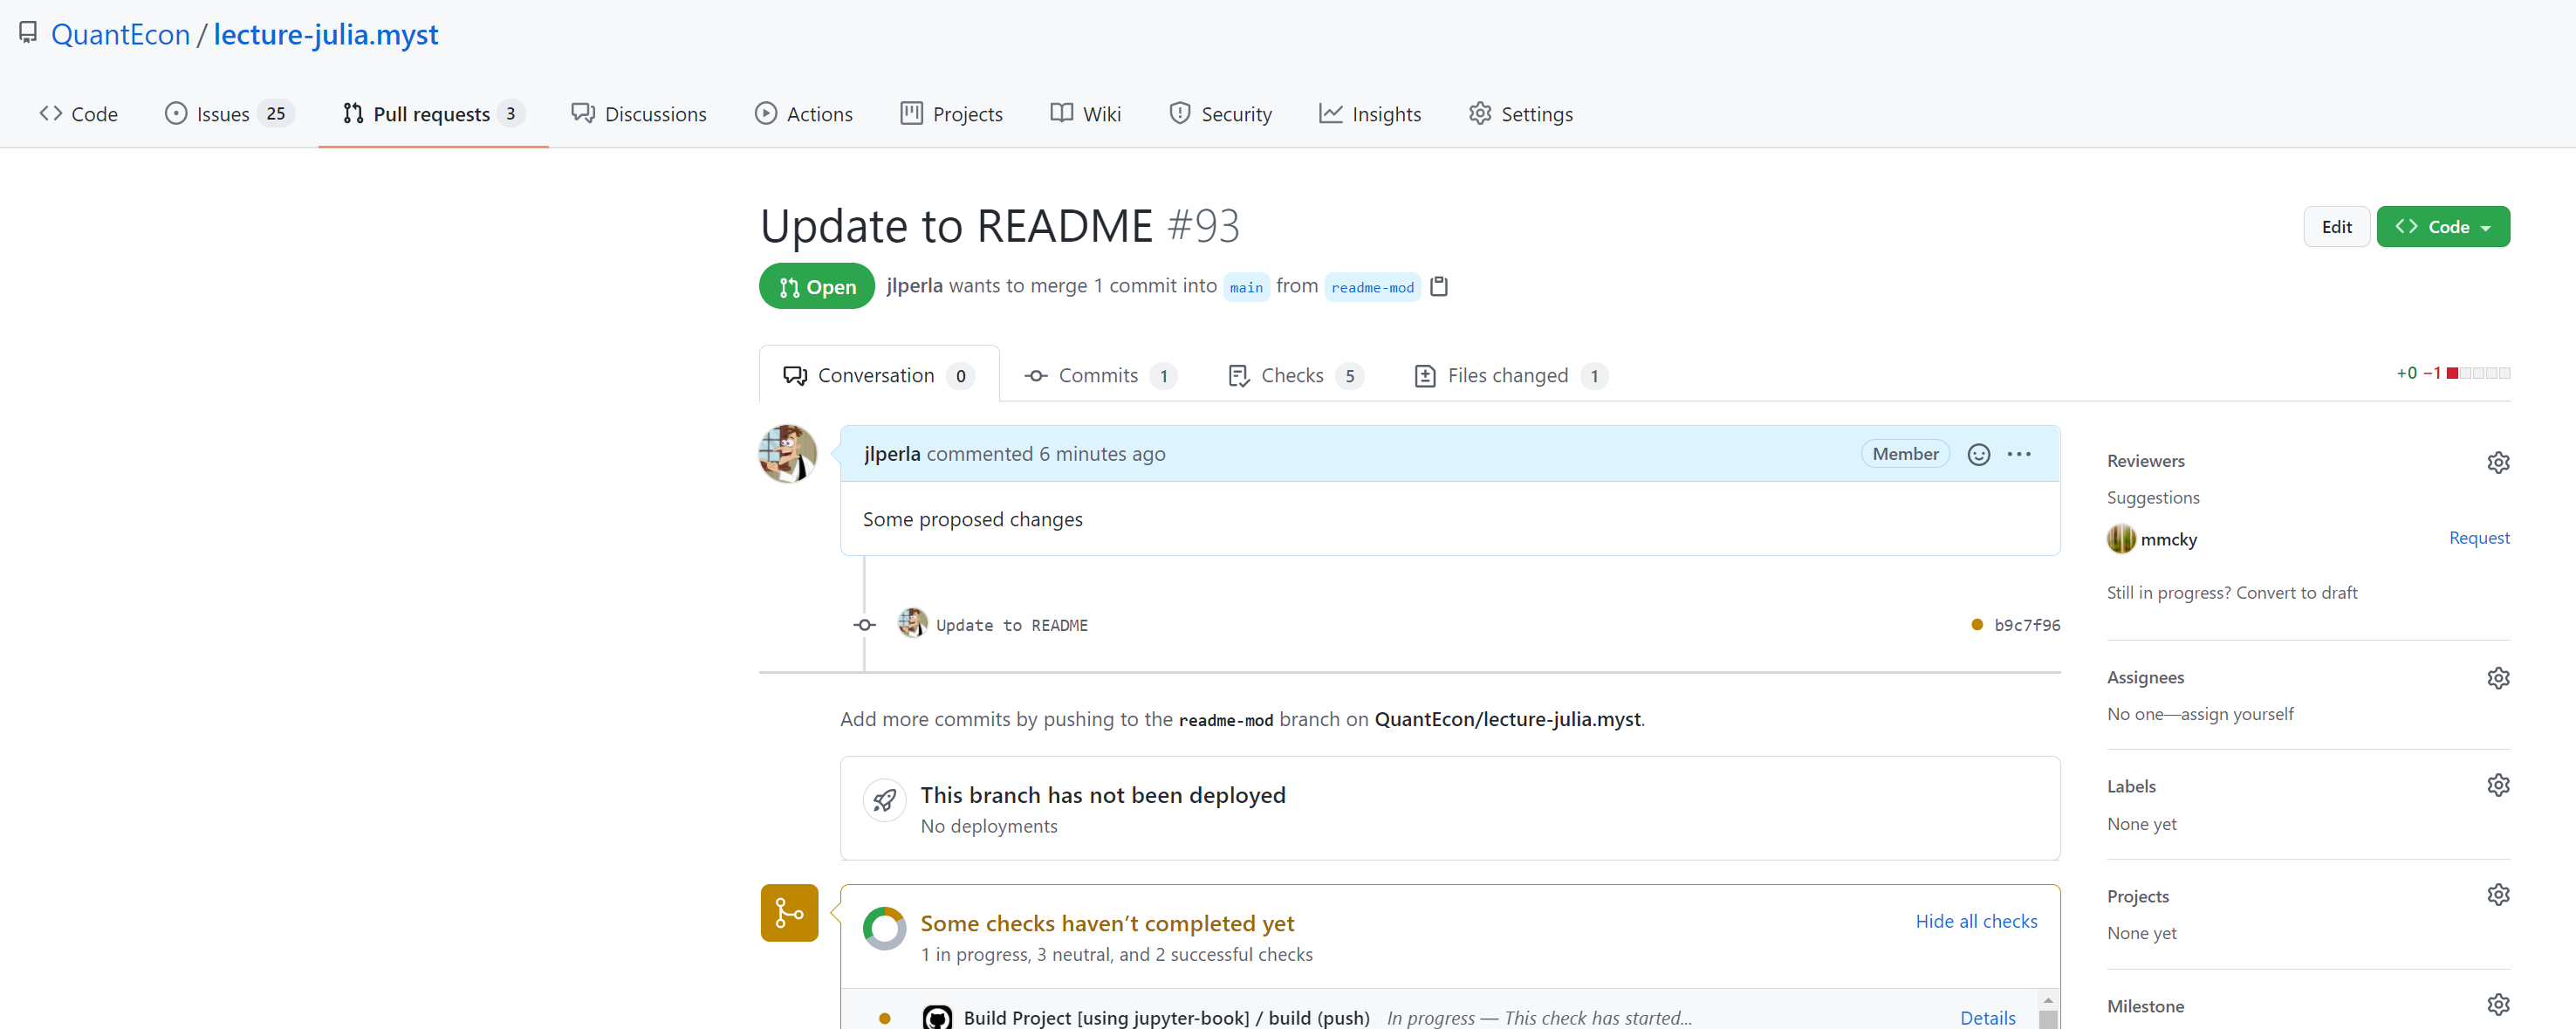
The maintainers of the repository can choose to accept the change, suggest modifications, comment on individual lines of code, etc.
If they like the changes, they may choose to “Merge the Pull Request”. This means that all of the commits proposed from your branch will be applied on top of the main branch on that repository.
If there are conflicts (i.e., you are changing files which have been modified on the main branch since you forked) then you may need to rebase your branch and pull request. This means applying all of the changes that have happened after your fork to your current branch.
While rebasing can be very complicated, for simple cases you can use the > Git: Rebase (Branch) command and choose upstream/main to get any of the recent changes. For more advanced resolution of conflicts and rebasing, GitKraken and GitLens have more elaborate features.
Creating a pull request is not like bundling up your changes and delivering them, but rather like opening an ongoing connection between two repositories, that is only severed when the PR is closed or merged.
12.5.3. Write Access Case#
As you become more familiar with GitHub, and work on larger projects, you will find yourself making PRs even when it isn’t strictly required.
If you are a maintainer of the repo (e.g. you created it or are a collaborator) then you don’t need to create a fork, but will rather work with a git branch.
Branches in git represent parallel development streams (i.e., sequences of commits) that the PR is trying to merge.
For example, back on our example_repository, select the branch name on the bottom left corner of VS Code, and make a new branch (e.g. readme-mod)
Modify the README.md file, then commit the change to your branch. As before, this only modifies your local machine, so you will need to publish the branch by clicking on the arrow next to the branch name.
While you could directly add a PR at this point, choose not to create one so we can create it on your webpage.
If we refresh the github website, it prompts us to create a PR.
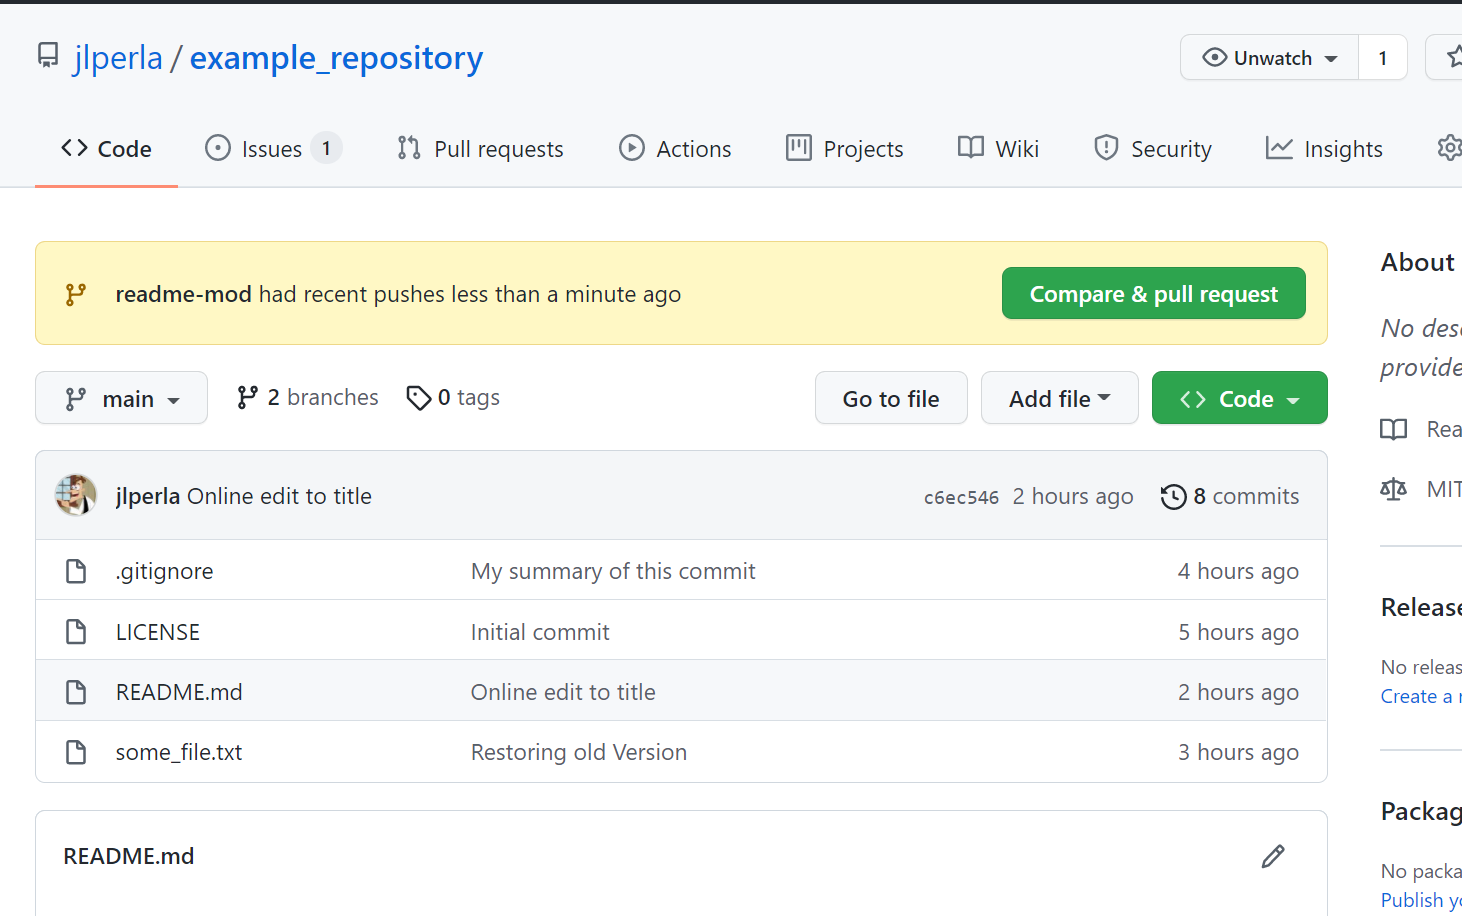
We can choose Compare and Pull Request at this point, giving the PR a name a description, or we can create one later with the branches tab on the repository. If we create the PR, we will see this in our Pull Requests tab at the top of the webpage
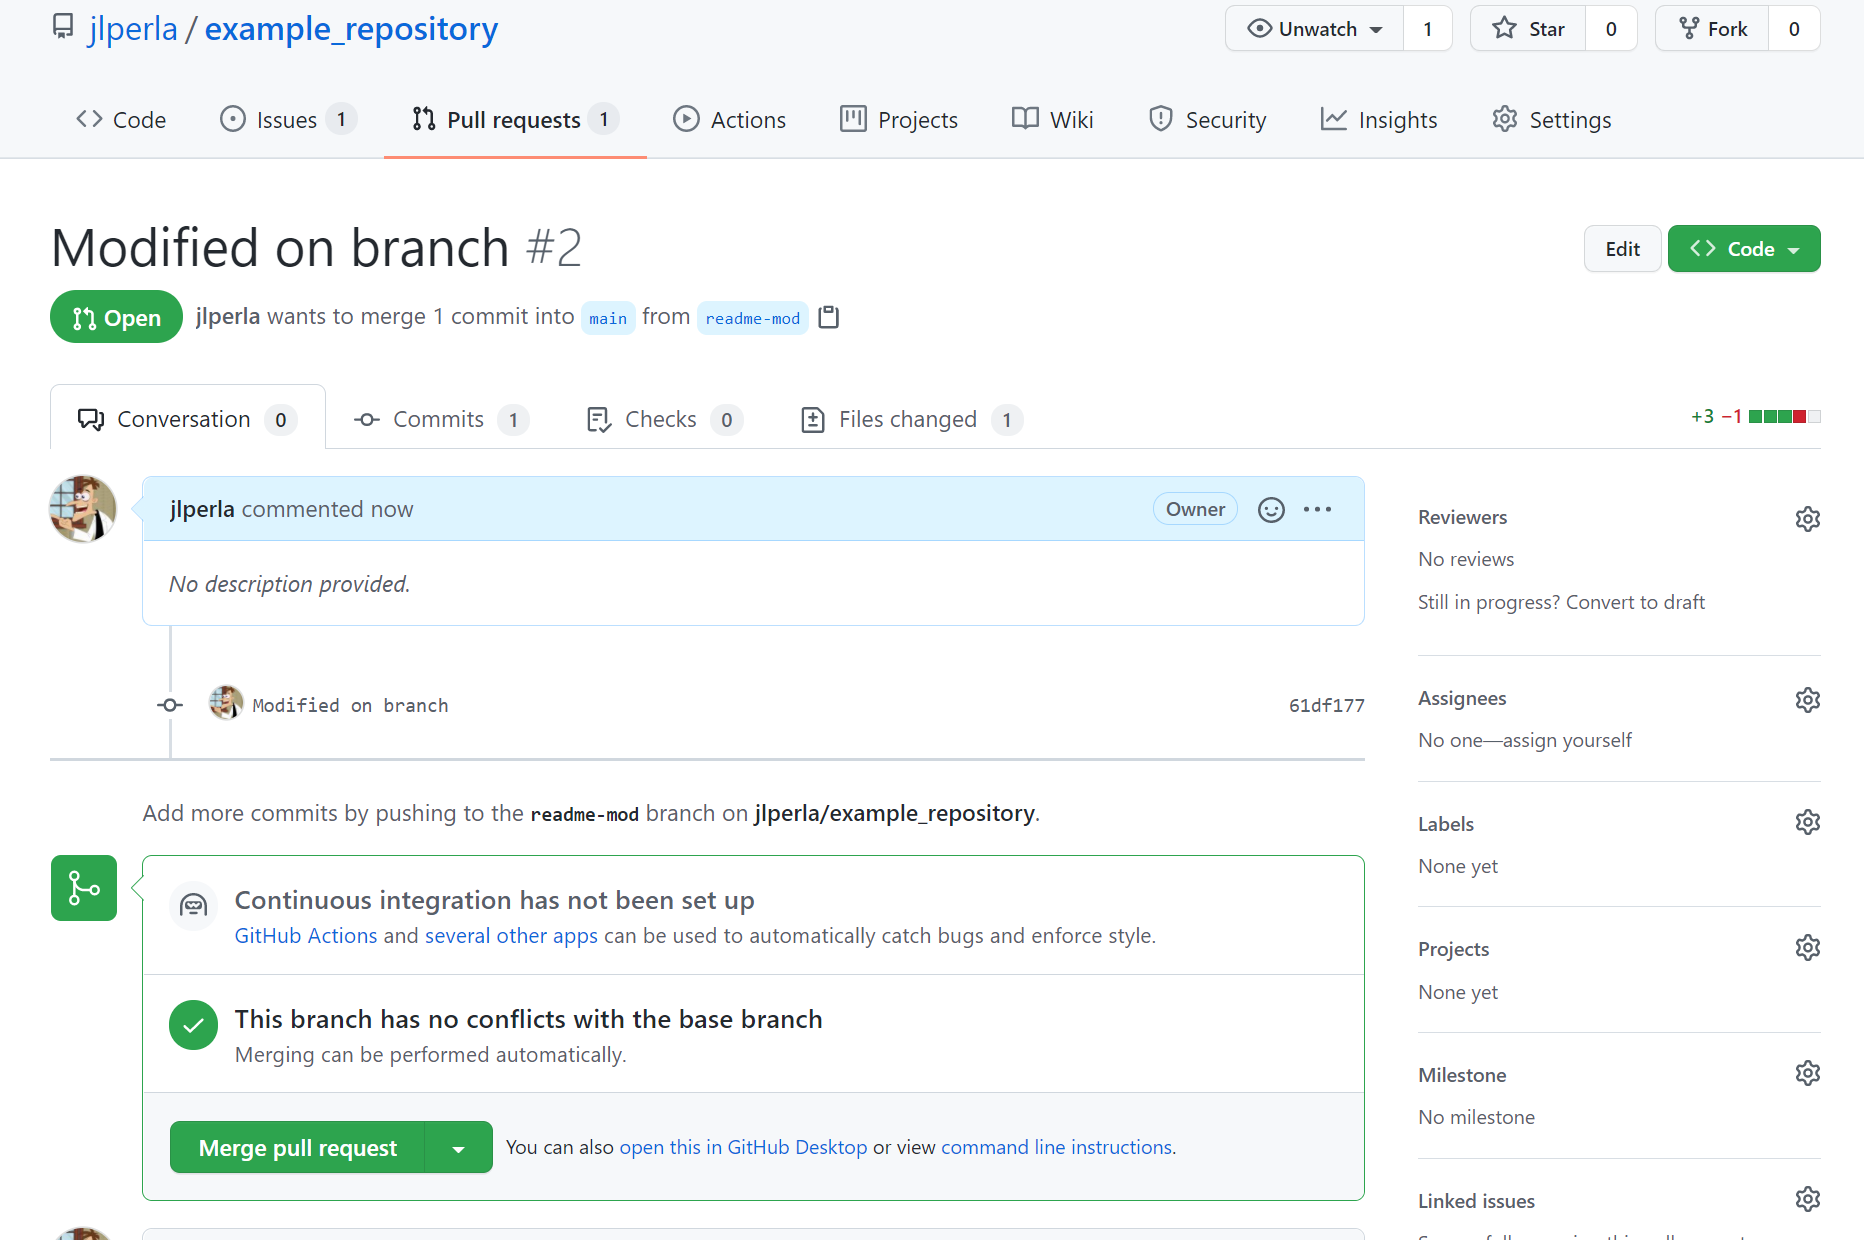
Typically these would be left open while a cohesive feature or bug is fixed in your code, and then merged.
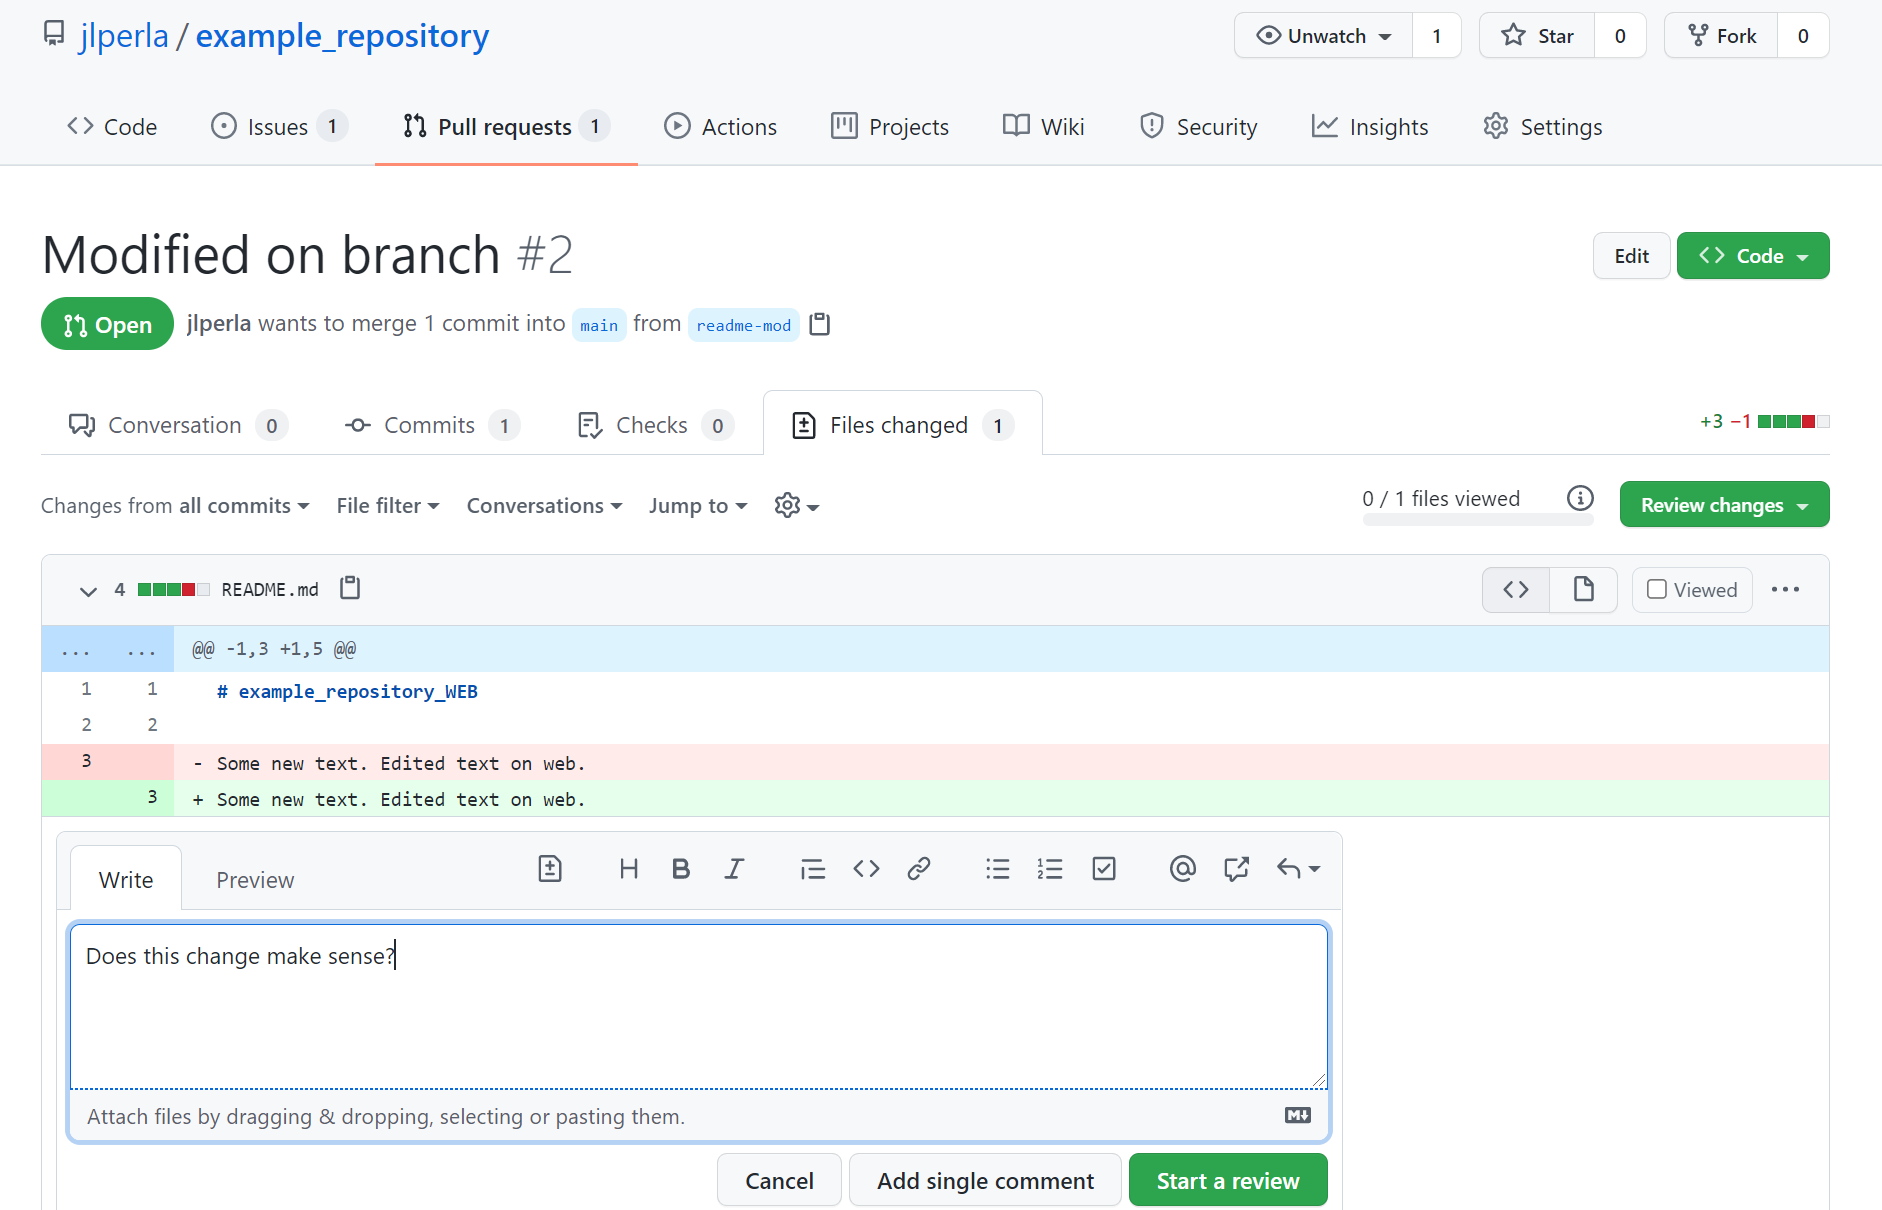
The Reviewers can look at the PR, select it on their desktops (by changing to the appropriate branch), and comment on the code.
Throughout, the main branch may be modified through other branches and commits, so this could become out of sync. If so, then rebasing and conflict resolution is required, as discussed above.
However, if no conflicts occur, and the commits from the branch can be merged into the main branch, then you can choose to Merge Pull Request.
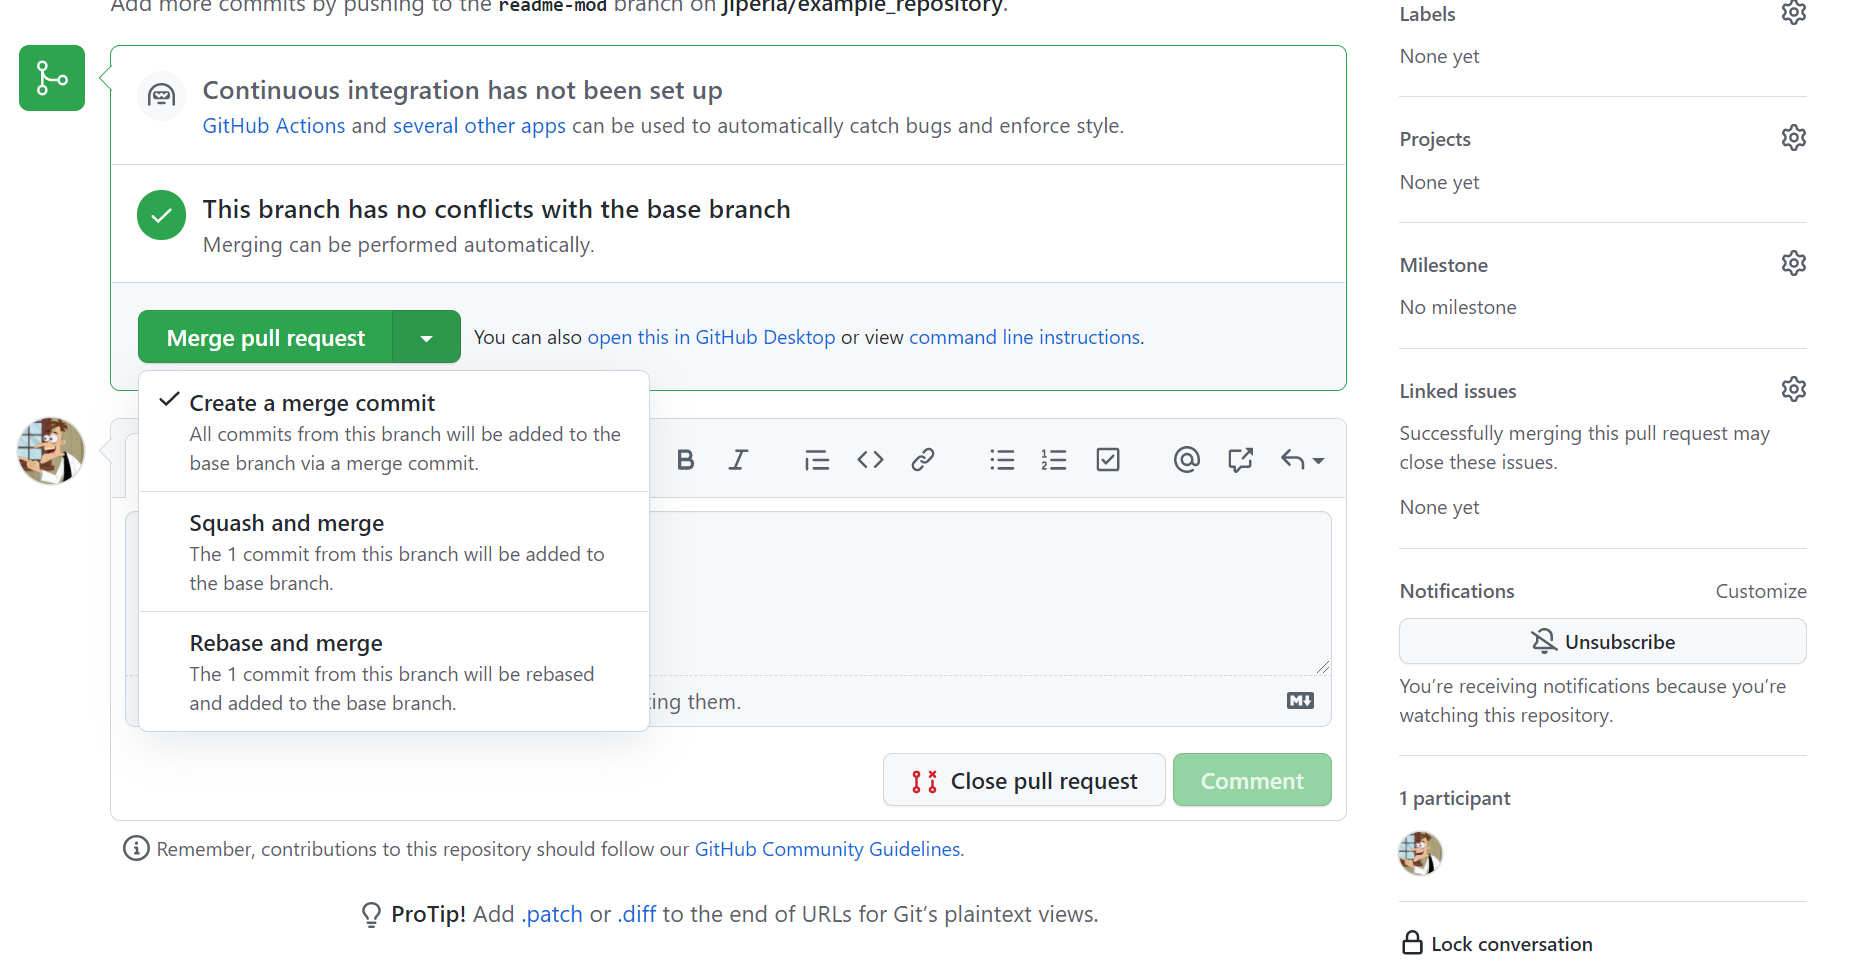
The key difference in the options is that the Squash and Merge will combine all of the individual commits in this branch into a single commit before merging into the main branch.
The UI then prompts you to remove the branch. After the PR has been merged, you will typically want to delete that branch to avoid accidentally modifying it.
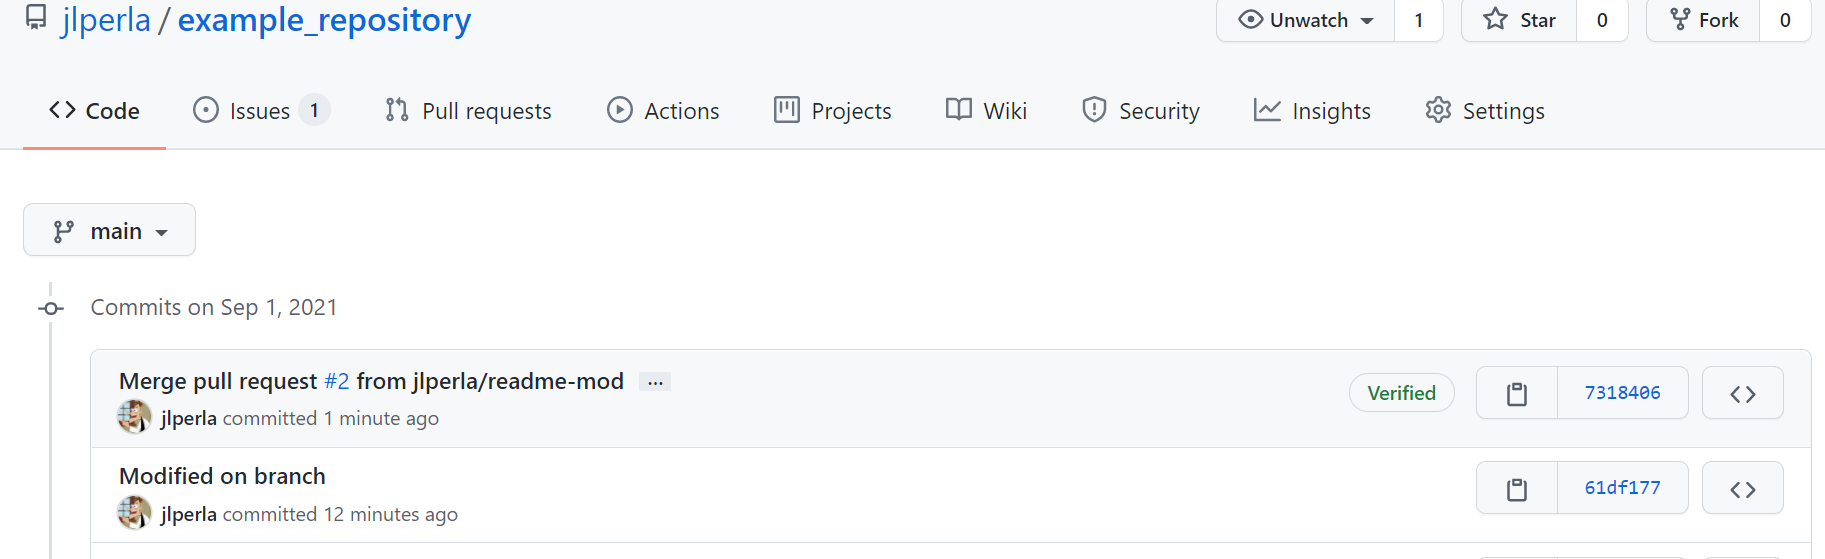
Finally, we see that this commit is now listed on the main branch
12.5.4. Julia Package Case#
One special case is when the repo in question is actually a Julia project or package.
We cover that (along with package workflow in general) in the testing lecture.
12.6. Additional Resources and Troubleshooting#
You may want to go beyond the scope of this tutorial when working with GitHub.
Here are some resources to help
Kate Hudson’s excellent git flight rules, which is a near-exhaustive list of situations you could encounter, and command-line fixes.
The GitHub Learning Lab, an interactive sandbox environment for git.
The docs for forking on GitHub Desktop and the GitHub Website.
12.6.1. Command-Line Basics#
Git also comes with a set of command-line tools.
They’re optional, but many people like using them.
Furthermore, in some environments (e.g. JupyterHub installations) you may only have access to the command line.
On Windows, downloading
gitwill have installed a program calledgit bash, which installs these tools along with a general Linux-style shell.On Linux/MacOS, these tools are integrated into your usual terminal.
To open the terminal in a directory, either right click and hit “open git bash” (in Windows), or use Linux commands like cd and ls to navigate.
See here for a short introduction to the command line.
As above, you can clone by grabbing the repo URL (say, GitHub’s site-policy repo) and running git clone https://github.com/github/site-policy.git.
From here, you can get the latest files on the server by cd-ing into the directory and running git pull.
When you pull from the server, it will never overwrite your modified files, so it is impossible to lose local changes.
Instead, to do a hard reset of all files and overwrite any of your local changes, you can run git reset --hard origin/master.
12.7. Exercises#
12.7.1. Exercise 1a#
Follow the instructions to create a new repository for one of your GitHub accounts. In this repository
Take the code from one of your previous assignments, such as Newton’s method in Introductory Examples (either as a
.jlfile or a Jupyter notebook).Put in a
README.mdwith some text.Put in a
.gitignorefile, ignoring the Jupyter files.ipynb_checkpointsand the project files,.projects.
12.7.2. Exercise 1b#
Pair-up with another student who has done Exercise 1a and find out their GitHub ID, and each do the following
Add the GitHub ID as a collaborators on your repository.
Clone the repositories to your local desktop.
Assign each other an issue.
Submit a commit from VS Code which references the issue by number.
Comment on the commits.
Ensure you can run their code without any modifications.
12.7.3. Exercise 1c#
Pair-wise with the results of Exercise 1b examine a merge-conflict by editing the README.md file for your repository that you have both setup as collaborators.
Start by ensuring there are multiple lines in the file so that some changes may have conflicts, and some may not.
Clone the repository to your local desktops.
Modify different lines of code in the file and both commit and push to the server (prior to pulling from each other)–and see how it merges things “automatically”.
Modify the same line of code in the file, and deal with the merge conflict.
12.7.4. Exercise 2a#
Just using GitHub’s web interface, submit a Pull Request for a simple change of documentation to a public repository.
The easiest may be to submit a PR for a typo in the source repository for these notes, i.e. https://github.com/QuantEcon/lecture-julia.myst.
Note: The source for that repository is in .md files, but you should be able to find spelling mistakes/etc. without much effort.
12.7.5. Exercise 2b#
Following the instructions for forking and cloning a public repository to your local desktop, submit a Pull Request to a public repository.
Again, you could submit it for a typo in the source repository for these notes, i.e. https://github.com/QuantEcon/lecture-julia.myst, but you are also encouraged to instead look for a small change that could help the documentation in another repository.
If you are ambitious, then go to the Exercise Solutions for one of the Exercises in these lecture notes and submit a PR for your own modified version (if you think it is an improvement!).